A Drywall Sander is a large scale sander that can quickly and efficiently sand large areas of drywall when your project is ready for primer and paint.
There are so many helpful options when it comes to sanding for your project. Each finish has a specific purpose and function that separates it from the others. I’ve researched through the internet and put together a summary on the Drywall Sander.
What is a drywall sander used for? The drywall sander is used to effectively prepare your drywall for painting by smoothing out any plaster covering joints, holes and corners. This tool helps speed the process for large scale jobs compared to using a hand sander and also comes with a shop vac attachement to help collect drywall dust particles that can be dangerous when inhaled.
Keep reading below to learn more about the Drywall Sander and what it can be used for.
Table of Contents
What Is a Drywall Sander Used For?
You’ve come to the end of your project, at last! Your drywall is up, and it’s almost time to prime and paint. But, before all that, you’ve got to seal your drywall and sand it.
This job creates a monumental amount of dust, so prepare by sealing off any doors, windows, and archways as best you can. When doing a major sanding job, you should always wear proper eye protection, preferably goggles, and a ventilated face mask. The particulates found in drywall dust can be extremely harmful if inhaled, but that’s a topic for another article.
Installing drywall requires the application of three layers of mud to seal and harden the drywall properly.
PRO TIP: Sanding should only be done ONCE at the END after you finish applying all three layers. It’s overkill to sand after each layer and simply unnecessary.
So, now that you’ve hung your drywall, and you’ve finished with the mudding, what’s next? Sanding the drywall. Here’s where it’s time to make yet another decision, which method should you use to sand your drywall?
What Kind Of Drywall Sanders Are Available?
It’s time to sand the drywall, and you go to the hardware store, and you say to the guy, “Hey, I need a drywall sander.”
He says, “Which kind?”
There are three different kinds of Drywall Sander.
- Manual or Swivel Pole Sander: Typically, a Swivel Pole Drywall Sander has a long polearm attachment so that you can reach all the way to the ceiling. The heads of these sanders can either be rectangular or round. They hold a sheet of sandpaper or a sanding screen that is shaped uniquely for their style. As its name suggests, this tool uses elbow grease to get the job done, and, in the world of power tools, it is best used for smaller jobs and spot-checking areas you may have missed with one the next two versions. The “swivel” in Swivel Pole refers to the head’s ability to rotate and flex around the end of your polearm to adapt its angle to your motion. These Swivel Pole sanders are useful on walls and ceilings.
PRO TIP: We recommend using the sanding screen. The holes in the screen will help to keep your sander from getting clogged with dust.
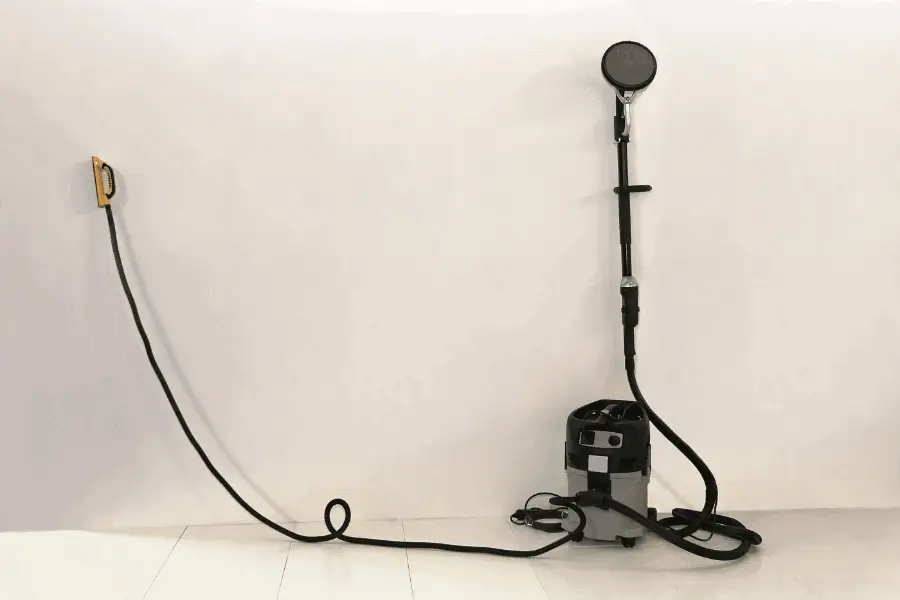
2. Dustless Power Sander: A Dustless Power Sander is an electric Drywall Sander with a built-in vacuum. As previously discussed, sanding drywall is extremely dusty business, and dust-laden air can have a negative impact on your finished results. Much like a Swivel Pole Sander, the Dustless Power Sander has a long polearm, making it easier to reach the ceiling. This polearm is typically a hollow tube connecting to a vacuum hose. The sanding head is typically round and uses a special kind of sandpaper with holes in it corresponding to the holes in the machine that allow dust to be sucked into the vacuum. Sanding screens also be purchased for these sanders.
A power sander is an obvious choice for any large job, such as remodeling a room or an entire house. The oscillating head on a power Drywall Sander cuts down on the time required to sand your drywall and, typically, helps you achieve more consistent results than a manual sander. Power Sanders are also far less taxing physically. Just plug it in, turn it on and gently guide the sanding head over the drywall surface.
USE INSTRUCTIONS: Holding your Drywall Sander in two hands, hold the sanding head flat against the wall. If you angle the handle too sharply and the head does not articulate correctly, you could gouge the wall. When sanding, with a power Drywall Sander, you should move the sanding head in a rectangular pattern rather than a circular motion, taking one horizontal pass before moving down to take another pass, running parallel to the first and then finishing up with a pass through the middle. Take your time and do not move too quickly.
3. Sponge Sanding: This final type of Drywall Sander refers more to a method than an actual tool. Most Swivel Pole Sanders can be converted for this use by switching your sandpaper or sanding screen out for a sponge. Sanding with a wet sponge is only useful when the mud is relatively even or for small jobs. Remember to rinse and wring the sponge often while you work. Wet Sponge Sanding may save you a great deal of time in cleanup as opposed to dry sanding.
Regardless of the method you choose for sanding your drywall, sanding is a slow process that you should approach with patience. As always, we recommend a progressive sanding method. For best results, start sanding with coarse grain sandpaper or sanding screen and gradually move “progress” to a finer grain with successive sanding. Move in a block pattern rather than a circular motion, and take your time.
Safety Reminder: Before beginning any sanding project or using power tools of any kind, wear the appropriate eye coverings and a mask.
How To Sand Drywall With A Vacuum
Subscribe to RENOS 4 PROS & JOES on Youtube
Is A Drywall Sander Worth It?
A drywall sander is worth buying if you are going to be working on multiple large scale drywall repair projects. This tool will help save time and energy involved in the tedious task of sanding your drywall to prepare it for painting.
