There are so many tools to learn about when you start woodworking. In this article I explain what a jointer does and why it is an important tool to help make your project the best it can be.
What Does A Jointer Do? A jointer does the function of flattening or straightening out any bowing, cupping or twisting on the edge or face of your wooden board so they can be joined effectively.
If you want to learn more about the benefits of using a Jointer in your woodshop keep reading down below.
What Does A Jointer Do?
A jointer does the function of flattening or straightening out any bowing, cupping or twisting on the edge or face of your wooden board so they can be joined effectively.
The main purpose of a jointer is to make things straight and flat. Using a jointer makes the whole building process easier because you can work with pieces of wood that are straight and flat. Jointers are used to make a flat surface along a piece of wood, whereas a planer can level the thickness of the wood. You can also put pieces of wood through a jointer and a planer to initially flatten them out and then smooth them out.
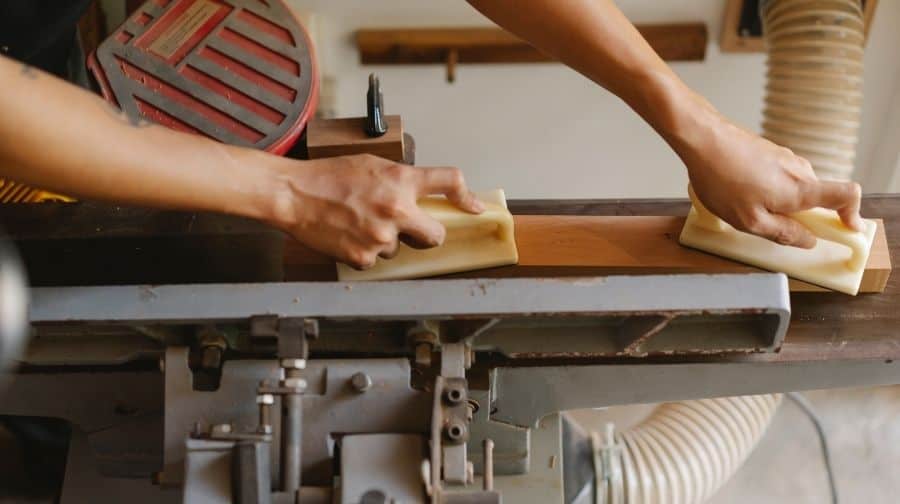
Using slight downward pressure and mainly forward pressure you push the board over the cutter head of the jointer to remove the distortion in the board leaving a flat smooth surface. Repeat this step on each edge of the board as necessary. This tool is used when needing to join multiple boards together.
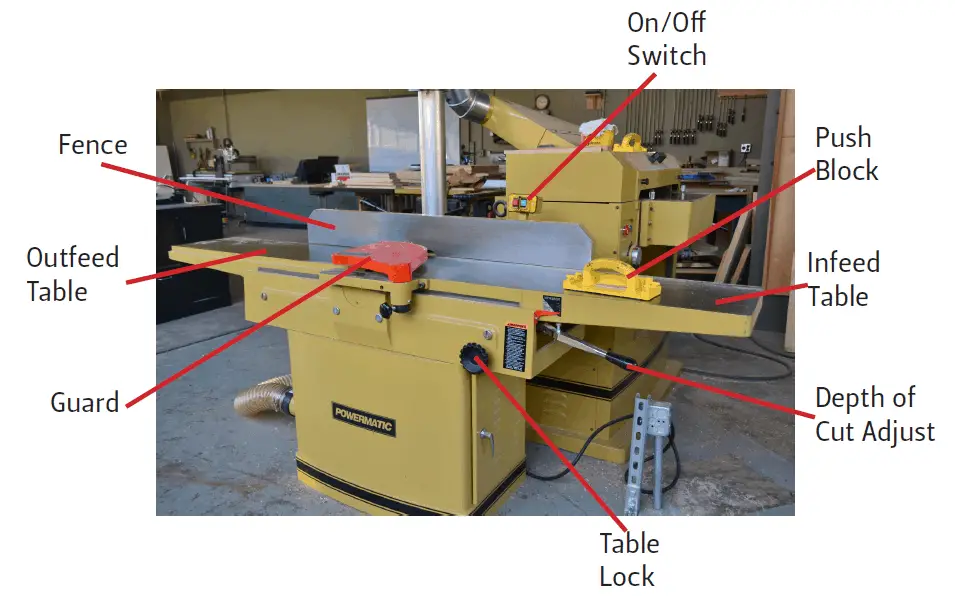
A jointer is a very important tool within many workshops. The tool is used to treat rough cuts of wood before you use them for any woodshop project. This is part of a process known as truing, which involves making your cut of wood perfectly rectangular and removing any distortion in the wood. The jointer tool shares some similarities to a planer, but there are some key differences.
Do You Really Need A Jointer?
If you want to run a piece of wood through a planer, you do have to joint the edges beforehand. This is because the planer itself won’t be able to keep the piece of wood flat. While the machine will flatten the wood out while it is being run through, the wood will snap back to its original shape when it comes out of the planer.
If you are going to be joining edges together, then you have to make sure they are flat and straight. Luckily, you don’t actually need a jointer to do that. While a jointer will generally make the process quicker, there are other ways to get the job done.
There are workarounds to a jointer that you can utilize if you are handy enough and don’t have a jointer on hand. This way, you will be able to avoid the cost of purchasing your own jointer, and sometimes even achieve better results.
What To Do If You Don’t Have A Jointer?
Use a Flush Trim Router Bit
You can make edges straight with a flush trim router bit, although it will be more time consuming than using a jointer. You just need to clamp a straightedge to the top of your cut of wood, align the pieces with your rip sled, and run the router along the side of your piece.
Use a Hand Planer
If you want to use a hand planer in the replacement of a jointer, it will take some more muscle power. The tool can work well on smaller pieces of wood. It does a good job of creating a flatter and smoother surface. If you have a straightedge that is longer than your piece of wood, you can track your progress as you move along, and it gives you more flexibility in terms of the length of your hand planer.
Use Winding Sticks
Winding sticks can be a great tool to use for face jointing. There are not a lot of other tools to do this aside from winding sticks. You can do this by using a flat sled that runs through your planer. You’ll have to find the high spots of your wood using shims, and hot glue the shims in place. You can then draw on the surface of the wood with a pencil, which will come off as the surface becomes smooth through the planer. Repeat this process on the other side.
Use A Table Saw
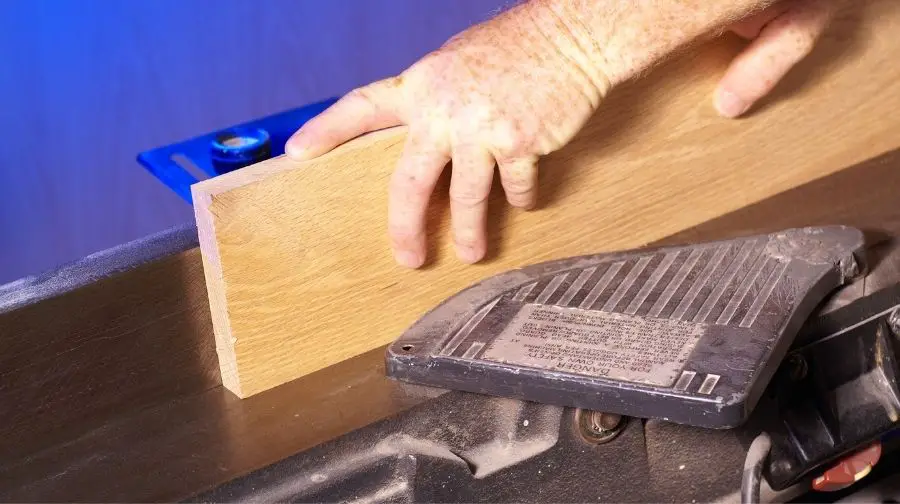
You can use a straight-line rip jig on the table saw. Line up your board so just a little bit is hanging over the edge of the jig. Use clamps to lock your board in place on the jig. Make sure your blade height is set high enough; then run your board through the blade to create a flat and straight edge.
The bottom line is that you don’t always need a jointer to do the job. There are lots of ways to do the job without a jointer, so the tool should be one of the last ones that you purchase for your shop.
Can I Use a Table Saw Instead of a Jointer?
Yes, you can use a table saw instead of a jointer. You will need to have a shop-made fence to do this. You can make the base piece 4” x 48”, and the vertical piece just needs to be wide enough so that you can clamp it.
Start by forming an L shape with the two pieces. We recommend using a thin-kerf 40 tooth ATB blade. This will give you a great surface on the jointed edge. We also recommend the thin-kerf over full-kerf because it will take off less material when you joint the edge. The kerf is just a way to measure how much of the wood is removed with each pass.
After ensuring that your table saw is unplugged, you can go ahead and clamp your L shop-made fence in place along your rip fence. You’ll want to make sure that it is centered in relation to the rip fence. Use a pencil to make a mark where the back of the blade lines up with the shop-made fence.
You’ll need to make a relief cut along your shop-made fence before you start using your table saw as a jointer. Start by aligning your rip fence on the left side of the table saw blade. Position the shop-made fence so that it is even with the outside face of the blade. Take your time and make sure that the blade and the fence are even before starting.
Now you are ready to run your table saw and cut the edge of the shop-made fence. If you have a feather board, you can use that to keep the shop-made fence tight along the rip fence. You’ll want to stop the table saw blade when you get to the pencil line that you drew.
At this point, you want to make sure that your cut is even along the outside edge of the fence. You want to ensure that you take off the right amount of material so that your cut is all the way straight until your blade relief point.
When you are done with the cut, you are ready to use the table saw as a jointer. Move your rip fence back to the right side of the table saw blade, and remove the riving knife. Make adjustments until the blade spins free and the outside tooth is even with your cut along the shop-made fence. You are now ready to make a test cut and start jointing!
There are plenty of workarounds to getting jointed edges, so if you’re running a shop and you don’t have a jointer you don’t have to worry. In fact, if you’re handy and you can utilize these workarounds, you can probably make a jointer the last tool that you buy for your shop. The workarounds typically feature common power tools, so you should be able to utilize at least one of them.
Can I Use A Jointer On Both Sides?
Yes you can. You can use the jointer on both edges of the board and both faces. Some will joint 1 side of the edge then run through a table saw and joint 1 side of the face then run through a planer. These methods will get the job done but using the jointer on all sides will create a higher quality board.
What Does a Benchtop Jointer Do?
A benchtop jointer flattens or straightens out any bowing, cupping or twisting on the edge or face of your wooden board. Using slight downward pressure and mainly forward pressure you push the board over the cutter head of the jointer to remove the distortion in the board leaving a flat smooth surface. Repeat this step on each edge of the board as necessary. This tool is used when needing to join multiple boards together.
Are Benchtop Jointers Any Good?
Yes, a benchtop jointer is a smaller version of a traditional jointer that fits on top of your bench. This is a great option for smaller shop spaces because a traditional jointer can take up quite a bit of space and the benchtop jointer is more affordable. It will be limited on the width and length of the boards you can joint but for a beginner with a smaller space this is still a nice option.
- Great for beginners.
- Great for small shops.
- Great first jointer.
- Great for when you have to downsize your shop.
- Great value for price.
Why Is A Jointer Called A Jointer?
The jointer gets it’s name from it’s purpose. It is used to refine and remove any distortions in boards of wood so they can be joined together effectively.
Click here to browse through Jointer options on Amazon.