The rabbet joint is a versatile and widely used woodworking joinery technique. Also known as the rebate joint, it involves cutting a notch, or groove, into one board so that another board can fit snugly into it. This creates a strong bond between two pieces of wood that can last for years with proper care and maintenance.
There are four primary types of rabbet joints – blind, stopped, open-ended, and full depth – each offering different levels of strength depending on the application.
In this article, we’ll look at each type in detail to decide which one is right for your project.
Overview Of Rabbet Joints
Rabbet joints are one of the most useful and versatile woodworking joints. They can join two pieces of material together, such as boards, panels, or even shelves. Rabbets provide a stronger joint than butt or miter joints. They create an overlap of the materials joined together. This overlap distributes the load over a larger area, making the joint sturdier.
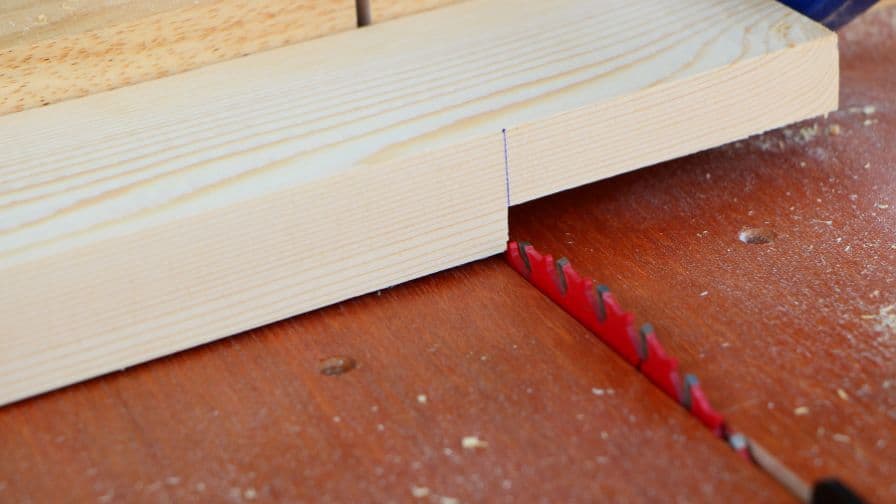
Rabbet joints can have cut in many ways. Some of the most common methods are with a rabbeting bit on a router table, by hand with chisels, or with a table saw. The method you choose will depend on your skill level and the tools you have available.
Rabbet joints are used in a variety of woodworking projects, from cabinets and furniture to window frames and picture frames. They can also use for doors, drawers, or even framing a house.
The great thing about rabbet joints is that you don’t need a lot of tools to get started making them. A good quality chisel, a sharp saw, and a router can get you going. With practice, you’ll build strong rabbet joints that will last for years.
So when you’re looking for an easy way to join two pieces of wood together, the rabbet joint is worth exploring! You’ll learn how to make them quickly and easily, and you’ll love the strength and durability of these woodworking joints.
Types Of Rabbet Joints
Rabbet joints are a versatile type of woodworking joint and can use in many projects. There are several different types of rabbet joints, each with its unique characteristics and uses. Let’s take a look at some of the most common types:
A. Blind Rabbet Joint
This joint is commonly used in cabinetmaking, and it’s one of the simplest to make. To construct a blind rabbet joint, you cut a recess or groove into two pieces of wood that will join together. The depth and width of the groove are larger than the thickness of each piece. So that when glued together, the joint is strong and secure.
B. Stopped Rabbet Joint
One of the easiest types of joints you can make is the stopped rabbet joint. This type of joint comes in handy when you’re joining two pieces together at 90 degrees and keeping them flush along their entire edge.
You can use a router or circular saw with a guide to cut out a rabbet in one piece and a stopped rabbet into the other piece. The two pieces fit together perfectly and can secure with screws or nails.
When building a stopped rabbet joint, your cuts are square and all measurements are exact. Take the time to double-check each measurement before you start cutting, as this will ensure that your joints will fit together perfectly.
As you’re looking for an easy and secure way to join two pieces at 90 degrees, you can’t go wrong with a stopped rabbet joint. It’s quick, and easy, and provides a strong bond between the two pieces. When done properly, it’s as solid and secure as any other joint.
So, give it a try – you won’t get disappointed!
C. Open-Ended Rabbet Joint
Subscribe to WOOD magazine
Now let’s talk about an open-ended rabbet joint. This is a great choice when you need to join two pieces of wood that have different thicknesses. It’s strong and secure, but also looks wonderful–perfect for furniture projects! To start,
-The edges of the two pieces are cut at an angle to form a rabbet.
-A shallow groove is then cut along the edge of each piece.
-The two pieces are then joined face to face and clamped together tightly.
-Finally, a few finishing nails are added for extra reinforcement.
This joint provides a lot of strength without the need for intricate joinery. Plus, it’s simple to do and looks fantastic when you’re finished!
So in looking for a powerful and attractive joint that works great with different thicknesses of wood, give an open-ended rabbet joint a try. You won’t get disappointed!
D. Full Depth Rabbet Joint
The full-depth rabbet joint is a useful and versatile connection for framing projects. It’s a superb choice when you need the strength of a tenon-and-mortise joint. But the mortise isn’t possible or practical in your situation.
This joint can connect two boards at right angles, create a corner splice, or join a board along its edge. The advantage of this joint is that it can cut quickly and accurately with one saw blade in the table saw.
To make this joint,
-Begin by setting up your table saw’s miter gauge to 90 degrees and adjust the rip fence. So that the two rabbet cuts are centered on the edge of the stock.
-Once you’re set-up, make a rip cut on each board to create two rabbets that mirror each other. The depth and width of the rabbet should come from your project’s needs.
-At this point, check both boards for fit, and trim as necessary with a handsaw or chisel.
-Finally, secure the joint with glue and a few nails or screws.
The full-depth rabbet joint is a reliable connection that will ensure the strength and longevity of your project. With practice, you can make this joint quickly and accurately. Pay close attention to your setup on the table saw and use a sharp, clean blade to make sure your cuts are accurate. With patience and practice, you’ll soon become an expert in the full-depth rabbet joint.
Why Is It Called A Rabbet Joint?
A “rabbet” joint is so named because it resembles an animal den or burrow. Rabbits are particularly well-known for digging out these sorts of nooks and crannies in which they can take shelter from the elements.
This joint is an L-shaped cut into the edge of a piece of material, often wood, to join two pieces together at right angles. It’s a simple but effective way to create mighty and durable joints without having to resort to expensive mechanical fasteners or more complex carpentry methods.
The rabbet joint has been around for centuries, a tried-and-true method of construction. It’s found in everything from furniture to windows, doors, and even boats. Its longevity speaks to its strength and effectiveness, as well as its utility – it can join pieces together quickly, easily, and with great stability over time.
So next time you’re in the workshop, why not give this classic joint a try? You’ll reward with strong and reliable joints that will last for generations. Plus, they look good! Happy building!
How To Choose The Right Rabbet Type For Your Project
Subscribe to Popular Woodworking
Choosing the right rabbet type for your project is essential to ensuring a successful outcome. A rabbet is a groove cut along the edge of the wood or other material, easier to fit two pieces together. There are several types of rabbets available, and they can use in many applications. Depending on your needs, there is a rabbet type that will work best for you.
The three main types of rabbets are blind, stopped, and through-rabbets.
-A blind rabbet is when the groove only goes partway into the wood or other material.
-Stopped rabbets go all the way through but have a shoulder that stops them from going any further.
-Through-rabbets go all the way through to the other side of the material.
When deciding which type of rabbet is right for your project, consider what kind of joinery you need and how deep you need the groove to appear.
-Blind rabbets are best suited for hiding joints in cabinetry or for joining two pieces of trim. They are useful for creating secret compartments or hiding hardware.
-Stopped rabbets are a great choice when you need to join two pieces of material together. But don’t want the joint to appear from the other side. This type of rabbet is also good for reinforcing joints like those used in mortise and tenon joinery.
-Through-rabbets are the most common choice for joining two pieces of material together, such as in drawer construction or lap joints.
When making your decision, consider the tools you have available. To create a rabbet,
-You need either a router or a table saw.
-For stopped and through-rabbets, you will also prepare either a router bit or a rabbeting cutter that is compatible with your saw.
Whichever type of rabbet you choose, measure twice and cut once for the best results! With the right type of rabbet, your project will reach success.
Tips And Tricks For Installing A Rabbet Joint Successfully
Installing a rabbet joint can get tricky, but it doesn’t have to. With a few simple tips and tricks, you can ensure that your project turns out right. Here are top tips for making sure your rabbet joint installation goes smoothly:
1. Measure twice, cut once: As with any carpentry project, measuring is essential to success. Take your time and double-check your measurements before cutting the rabbet joint pieces so that they fit together perfectly.
2. Use the right tools: Having the right tools for the job is key for any carpentry project. So you have a good quality saw or router when you’re planning to make rabbet joints.
3. Use clamps: Clamps are essential for securing the pieces of wood you’ll cut and join together. Your clamping pressure is even and consistent across the joint so that it will fit together properly.
4. Sand down any rough edges: Once the joint is in place, you’ll want to sand down any rough edges. This will allow for a smoother finish and the joints fit together better.
5. Use wood glue: Wood glue is essential for making sure the rabbet joint stays secure. It’s spread evenly across the surface of both pieces before joining them together.
Following these tips can construct a mighty and lasting rabbet joint with ease. With the right preparation and tools, you’ll build beautiful projects that stand the test of time.
Maintenance And Care For Your Woodworking Projects With A Rabbet Joint
Making a rabbet joint is an important part of any woodworking project. It’s the perfect way to make sure your joints are strong and secure. But it takes some knowledge and skill to do it correctly. To get the most out of your rabbet joint, we’ve put together this guide on maintenance and care for your rabbet joint.
-First, you use the right tools to create the joint. You’ll need a chisel or router and clamps to hold the wood in place while you work.
-Additionally, use sharp blades and clean surfaces so everything glides smoothly while making cuts.
-Use wood glue when doing your joint. This will make the rabbet joint stronger and more durable.
-Check your joints regularly for any signs of wear or gaps between the two pieces of wood. These are indicative of a weak joint. So keep an eye out for them.
-You can use sandpaper to smooth out the rabbet joint. Do not overdo it, as this can weaken the joint itself.
-Finally, seal your joints with a varnish or finish of your choice. This will protect them from the elements and ensure they last for years to come.
With these tips in mind, your rabbet joint will stay strong and secure for years to come. Take the time to maintain and care for your joint, and it will reward you with a beautiful and long-lasting result.
Recommended Posts:

