Corner clamps are devices that help secure corners of your project while gluing or securing them together.
There are so many helpful options when it comes to clamps for your project. Each clamp has a specific purpose and function that separates it from the others. I’ve researched through the internet and put together a quick summary on corner clamps.
What are corner clamps used for? Corner clamps are is used to hold two items at a 90° or 45° angle before they are attached. Corner clamps are commonly used for miter joints, T-joints, butt joints, to make cabinets, cases, drawers, frames, and boxes
Keep reading below to learn more about corner clamps and what they can be used for.
What Are Corner Clamps Used For?
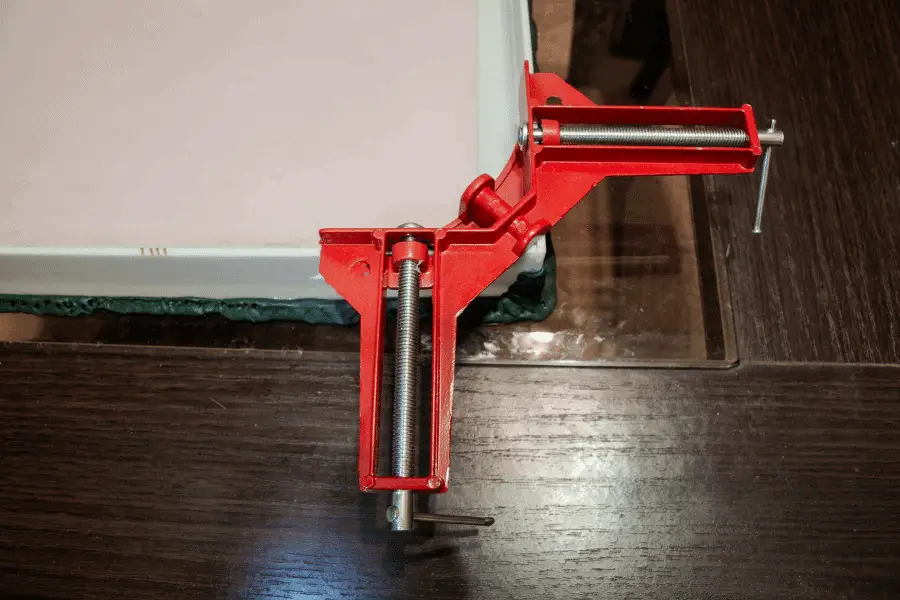
Corner clamps, as the name suggests, are clamps designed to clamp objects in a corner, I.e at 90° and 45°. The device is used to hold two items at a 90° or 45° angle before they are attached.
Corner clamps are sometimes referred to as miter clamps because they are regularly used to form miter joints. Corner clamps can be used with free-hand or could be attached to a workbench with fixing clamps to prevent any movement during its use. It could also be attached to a drill press bed for clamping objects when drilling holes.
Corner clamps embrace two strips or slabs of solid material perpendicularly keeping the joint between them intact. In a corner clamp, the clamping face and the supporting arm make a right angle which is why the corner arm is sometimes referred to as a right-angle clamp.
Curious about What Is A C-Clamp Used For? Please consider reading our article about the topic at this link here https://topwoodworkingadvice.com/what-is-a-c-clamp-used-for/
What Are The Types Of Corner Clamps?
Corner clamps are relatively small when compared with other types of clamps as they have a jaw opening, which is the maximum width that the jaws can open up to, is quite restricted. Nevertheless, there are still different sizes and types of the corner clamp, namely:
Quick Release Corner Clamps: This type of corner clamp is similar to other corner clamps but are more convenient because they are manufactured with a quick release handle to help set the clamp in place and quickly remove it once your corner is secure.
Single Screw Corner Clamps: This type of corner clamp is designed with a single screw that controls the movement of the clamp’s jaws. All the parts which comprise the two joints can pivot to allow the clamp to tightly grasp the different workpieces and create perfectly straight joints. The single screw corner clamps can come in light-duty or heavy-duty models to hold workpieces of any kind of material.
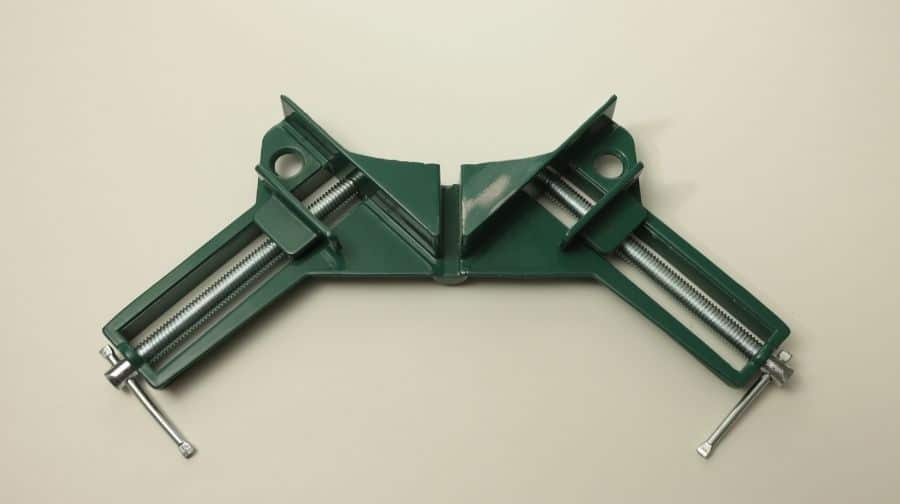
Double Screw Corner Clamps: This device is designed with two screws which control each of the two jaws separately. This means that when the clamp is being used, each jaw has to be adjusted to fit each piece in the project until they are all tightly secured. The square edge of the clamp ensures the joint the workpiece makes is at a perfect 90-degree angle so no mistakes can be made. The double screw corner clamps are sometimes used in pairs to make sure the opposite corners of the object are assembled straight.
Welding Corner Clamp: This is a heavy-duty model of corner clamp that is specifically used in the process of welding corners. This clamp has a very strong design as a lot of pressure is put on it due to the fusion of the parts it is used to clamp. This type of clamp could also be fastened to a drill press machine to hold materials firmly while drilling is being performed.
What Are The Parts Of A Corner Clamp?
Although the different types of corner clamps are operated slightly differently, the parts are very similar. The main common parts of these clamps include:
The Jaws: This is the part of the clamp that performs the actual holding of the workpiece together while clamping. The jaws in a corner clamp are designed with a ‘V’ shape where the workpieces are placed so they can meet at a 90-degree angle.
Each jaw has a clamping surface along its edge which is pressed against each side of the workpiece during the clamping and keeps it in place. The back jaw of the single screw clamp can pivot to various angles to allow workpieces of different angles to be clamped while on a double screw corner clamp, there are two back jaws which can be adjusted independently using the screws that are attached to them.
The single screw clamps also contain a front jaw which could either be pivoted to the left or right and move backward or forwards so various thicknesses of workpieces could fit in it, whereas the double screw corner clamp front jaw is static and set to a 90-degree angle relative to one another.
The front jaw (which is often referred to as the head) has two clamping surfaces and they are used in collaboration to hold the workpiece sturdily.
Screw(s): The corner clamp has either one or two smoothly rolled, threaded screws with steel sliding pins. These screws are responsible for controlling the opening and closing the jaws of the clamp.
Handle: The handle of a corner clamp is used to either tighten or loosen the screw, thereby indirectly controlling the state of the clamp’s jaws. The handle controls the movement of the screw. The clamp could either have one or two handles, depending on the number of screws on the clamp.
Curious about What Is A Bar Clamp Used For? Please consider reading our article about the topic at this link here https://topwoodworkingadvice.com/what-is-a-bar-clamp-used-for/
What Kind Of Joinery Can You Do With A Corner Clamp?
A corner clamp is used for assembling projects using different pieces and for creating joints between materials. These corner clamps could be used in making a variety of joinery such as:
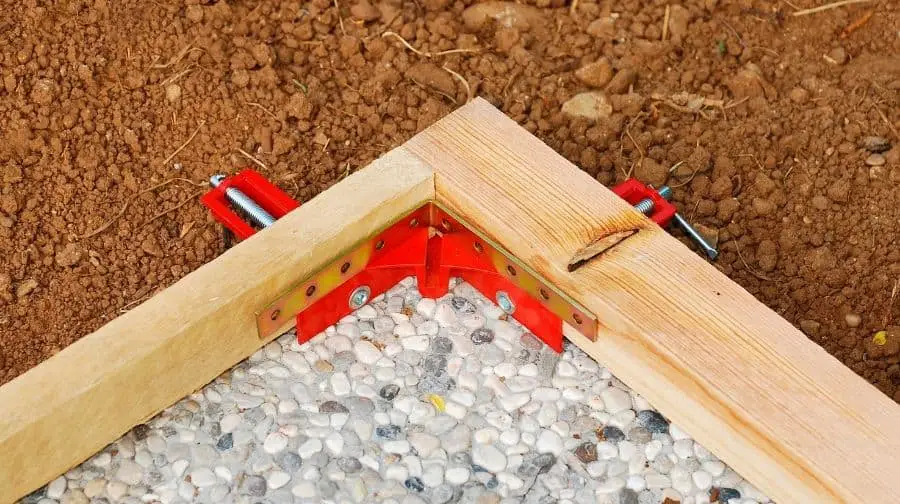
Mitre joints: A miter joint is made by putting to parts together, with each at a 45-degree angle for them to be joined together and create a 90 degree angled joint. The two parts, after being clamped together can then be connected permanently using glue, adhesive, or even nailing them together.
The corner clamp is the perfect tool to use for creating miter joints as the clamps’ jaws could be opened up more or closed to allow for different levels of thickness so the joint created would be faultless.
T-joints: The T-joint is used when the pieces to be attached are positioned together in a ‘T’ shape. The pieces will then be permanently attached using glue or another type of adhesive. No matter the difference in thickness between the two parts, an angle clamp would still be able to make a flawless T-joint.
Butt joints: Butt joints are created when two pieces are attached squarely together by their abutting ends. It is relatively easy to make but it is also one of the weakest joints. The butt joint is very easy to create with the use of a corner clamp as the jaws could easily be moved to fit the pieces of wood at the needed angle.
Angle clamps are regularly used for making frames, repairing window screens, and in metalworking applications, particularly welding. The corner clamps are also used to help in splicing, doweling, gluing, and nailing.
What Is The Best Corner Clamp?
The best corner clamp will depend on your budget and project needs. If you rarely take on projects that require connecting corners than a DIY or affordable corner clamp option will be best.
If you make a lot of cabinets, cases, frames and boxes then investing in quality corner clamps will increase the quality of your project. I prefer the Kreg 90° corner clamp for the quickest and easiest option.
Curious about What Are Quick Grip Clamps Used For? Please consider reading our article about the topic at this link here https://topwoodworkingadvice.com/what-are-quick-grip-clamps-used-for/
Where To Buy Corner Clamps?
You can buy corner clamps from your local hardware store like Home Depot, Lowes, ACE Hardware, and Harbor Freight. You can also order them from Amazon and manufacturer websites.
How Do You Clamp Corners Together?
The easiest way is to use a corner clamp, but if you don’t have a corner clamp here is a method to clamp corners.
By using a square block that matches your corner angle you can place it on the inside of the your two work pieces and use traditional clamps to secure your corner in place to allow the glue to dry to secure your corner. Once it’s dry just release the clamps and remove the block.
How Do You Make A Corner Clamp?
Start with a square scrap piece of plywood. Draw lines to divide the piece into 4 sections then use a speed square to draw lines to create triangles.
Drill through the point where the triangles intersect with a foster bit. Use your miter saw to cut the proper angle of the triangle to cut it out. Once all four triangles are cut out cut the remaining pieces into four.
How Do You Attach Mitered Corners?
The best way to attach mitered corners is to use a corner clamp or miter spring clamps (here is our blog post on spring clamps) but if your working on a small project and don’t have one then here is a quick and easy option for your project…the secret is painter’s tape.
Line up your workpieces and flip your mitered cuts upside down so the angle cut is facing downward. Apply painter’s tape to each workpiece connection. This will act as a clamp to apply some pressure to allow your corners to dry during the glue-up process.
Now flip the taped pieces over and apply your glue to the corners you will be joining. To avoid glue squeeze out on your work pieces apply painter’s tape to each extending edge of your miter cut to prevent glue from sticking to the wood.
Once your glue is applied start to fold the pieces to connect the corners. Once you have folded all the pieces apply painter’s tape to that last corner of your box to secure.