A Parallel Clamp is a fastening device used to securely hold objects together, to avoid any movement or separation.
There are so many helpful options when it comes to clamps for your project. Each clamp has a specific purpose and function that separates it from the others. I’ve researched through the internet and put together a quick summary on parallel clamps.
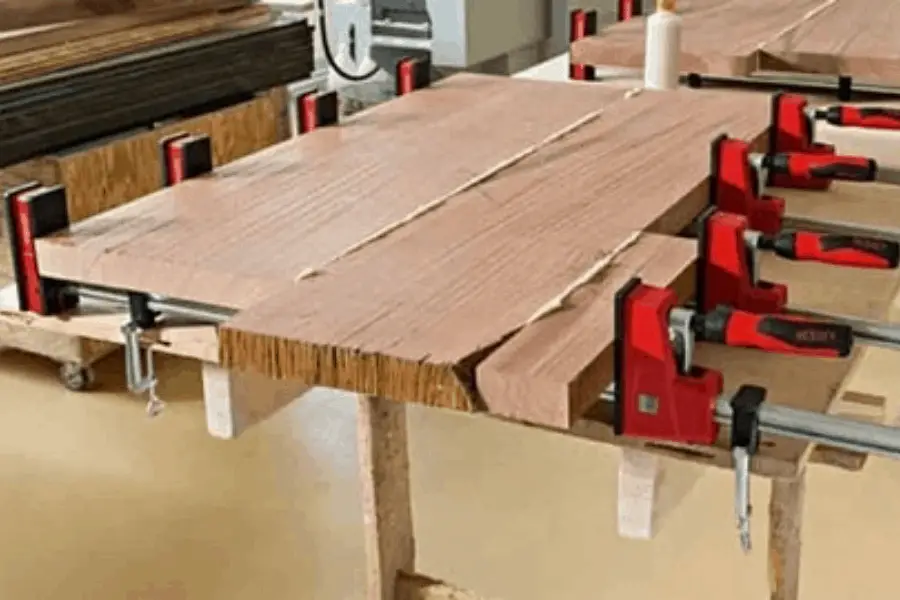
What is a parallel clamp used for? The parallel clamp allows for large and wide opening capacities and the clamp jaws remain parallel under increased loads in order to give a huge distribution area and prevent leaving dimples in the wood. Parallel clamps are commonly used for making doors, panels, cabinet doors, cabinet bases, boxes, tables and frames.
Keep reading below to learn more about the parallel clamp and what it can be used for.
What Is A Parallel Clamp Used For?
The parallel clamp evolved over the years from the F-Clamp to be more versatile and is commonly used for making doors, panels, cabinet doors, cabinet bases, boxes, tables and frames. Some clamps bow when using which ruins your project once the glue dries but parallel clamps will stay parallel. They have large clamping faces that are set at right angles parallel to each other which helps reference edges when clamping. They have a flat bottom so you can lay it on the table making them very easy to work with. You can even reverse the clamp to make it function as a spreader.
Because the face of the clamp is so large you can use the sides, bottom and top of the clamp to hold your work piece. Most parallel clamps come with a plastic protection piece for your material to rest on instead of the bar preventing any glue from getting stuck on the bar of the clamp. This clamp may be more expensive, but it can replace your F-clamp, pipe clamps and sash clamps.
Parallel Clamp Accessories:
Clamping blocks can help get really nice square frames.
A Clamp extender allows you to connect 2 clamps to create 1 giant clamp for your project.
A Tilting Adapter allows you to clamp at different angles because it creates a tilt on the clamp.
A Wide Pad accessory allows for a broader pressure surface.
What Is A Parallel Clamp?
A parallel clamp is quite similar to the f-clamp but it is different. The parallel clamp allows for large and wide opening capacities. The parallel clamp is good for woodworking and large opening capacities; the clamp jaws remain parallel under increased loads in order to give a huge distribution area and prevent leaving dimples in the wood.
The parallel clamp is characterized by having steel-reinforced, resin-covered jaws 3″ to 4″ deep that tighten up parallel to each other, beefy steel bars, heavy-duty handles and screws, and loads of clamping strength. They are designed for maximum strength and rigidity. They are also extremely useful for holding work together in tapping, drilling and on various machine set ups.
Parallel clamps are good for lamination projects that require a lot of clamping pressure. This is a tool that provides precision and power with exact 90 degree clamping at up to 1,700 lbs. of pressure.
Subscribe to Timbecon on Youtube
How To Clean Parallel Clamps.
This can appear to be simple but it is a super project to finish. The major items needed in cleaning the parallel clamps is a single 10′ 2×4 and a few lengths of 1.5″PVC pipe. Moreover, the number of pipe you will need will be dependent on how long you make each cleaning tube. Furthermore, this also will be largely dependent on the number and size of the parallel clamps you have within your reach.
After months of continuous use of your clamps, your clamps are going to have built up glue to the extent that it becomes so hard to slide the lower jaw and also make flat registration for your work pieces that you are clamping.
Firstly, you need to cut your parts. So take your 2×24″ sides, (2) 22.5 top and bottom,(2) 12″ feet. If you have that, then that is a congratulatory message; you have all the parts to make the rack. So we move to the cleaning tubes. When making the cleaning tubes you have to consider carefully the number and size of the clamps that you own.
You have to make at least two different sizes to accommodate your smaller and larger clamps. Now assembling the clamp cleaning rack. It’s advisable to seal the bottom of each tube. If you don’t do this, your cleaning solution will leak out of the tubes onto the floor.
You are also to use your choice of silicone, epoxy, polyurethane glue or PVC glue seal the PVC end caps. Make two holes in the top and two in the bottom of each side. After attaching the two sides to the top, fasten the two feet to the bottom of each side using two 3″ screws on each side. Now insert each of the pipes into the holes in the top of the rack.
Insert them from the bottom and make sure to insert them to the point that the ends of the tubes are past the feet. Using the feet as a registration point, attach the bottom to the two sides using tow 3″ screws on each side. Conclusively, slide the end caps of the tubes onto the pockets on the bottom of the rack.
After this pour the vinegar into each tube carefully, also keep some shop towels handy for easy cleanups. Carefully take each clamp and slip the clamps info the tubes of vinegar. Allow the clamp soak for an hour( at least), then remove add some paste wax to the clamp bars; this prevents future glue from sticking to the clamp. Put the clamps back together after that.
How Do You Use Parallel Clamps?
When using parallel clamps you always want to do a test run before adding your glue to the project. Make sure your connecting edges have been jointed or are evenly flat to make a great connection. Set up your parallel clamp flat on your workbench. Add your panel pieces to the clamps and apply gentle pressure by twisting the handles. Exam the connection to make sure it is flush and ready for glue.
Release the face clamps and add your glue to the panels. Add pressure to the face clamps again by twisting the handle to get the boards set tightly to allow time for the glue to dry. Be mindful of not adding too much pressure because it can cause the steel bar to bow affecting your connection. Once glue is dry loosen the handles and inspect your project.
Benefits of Parallel Jaw Clamps
Subscribe to WoodWorkers Guild Of America on Youtube
Cheap Parallel Clamps
Everybody knows the saying a woodwork can never have enough clamps… but us woodworkers haven’t figured out how to grow a money tree in the backyard just yet so if your clamp budget is tight or you are just beginning your woodworking journey then it’s best to consider cheap parallel clamps.
Here is a selections of some Cheap Parallel Clamps:
What Are The Best Parallel Clamps?
If your an established woodworker or trying to upgrade or replace some other wood clamps with a more versatile clamp then spending a little more money for the best parallel clamps would be worth it.
Here is a selection of the Best Parallel Clamps:
Why Are Parallel Clamps So Expensive?
Manufacturers of parallel clamps all compete with each other to make the most durable, high quality, and long lasting parallel clamps possible. To do this they have to use high quality metals, add ergonomic handles, use thick plastics to cover delicate parts, attach wide face clamps with soft rubber to protect your project and include the strength of up to 1,700 lb clamping force.
Most woodworkers understand quality and don’t want to have a parallel clamp fail on them in the middle of a project.
Where Are Bessey Clamps Made?
Bessey Clamps are assembled in the USA but the steel rail and spindles are manufactured near Stuttgart, Germany.
In 1889, Max BESSEY founded the company BESSEY & Sohn in Stuttgart as a bright steel drawing plant.