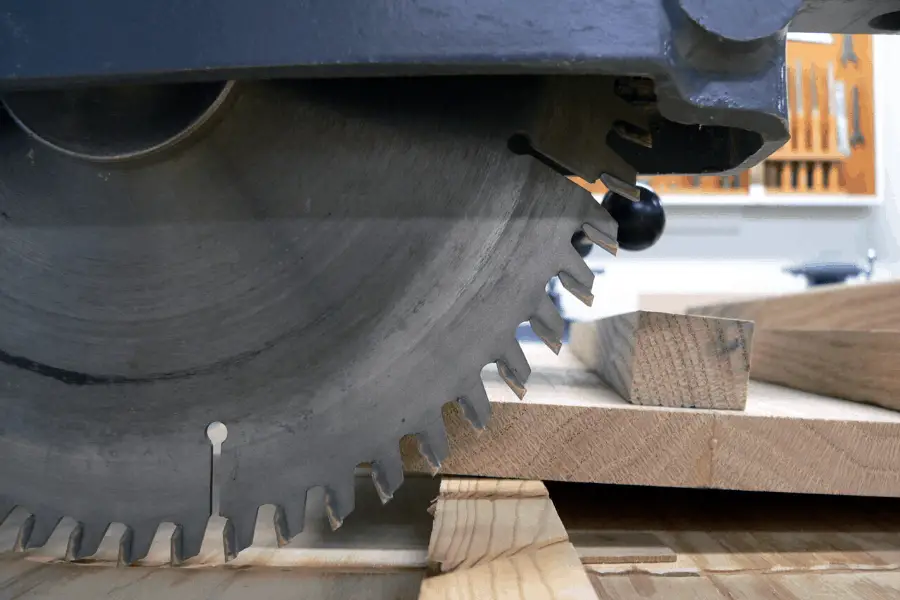
The Radial Arm Saw is essentially a circular saw suspended above a work table. For most operations, the blade cuts through the workpiece and runs along a kerf in a piece of hardboard or plywood that is glued to the saw table.
What is a radial arm saw used for? The radial arm saw is one of the most versatile saws; it is used for making angle cuts, crosscuts, bevel cuts, miter cuts, ripping boards two ways in-rips and out-rips, dado cuts, rabbet cuts, groove cuts, cutting finger joints, cutting moldings and with an accessory can be used as a router.
Read further down below for more details on the radial arm saw and what it is used for.
What Is A Radial Arm Saw Used For?
A radial arm saw is used for a variety of tasks, such as cutting lumber, trimming boards, and making crosscuts. It can also be used to make rip cuts, which are cuts that run along the grain of the wood.
The radial arm saw is a versatile tool that can be used for a variety of different woodworking tasks. If you’re looking for a tool that can help you with a variety of different projects, then the radial arm saw is a good option for you.
The machine’s many pivoting and sliding parts enable it to carry the blade into a workpiece from a variety of different angles and directions. Sliding the yoke along the arm pulls the blade across the table for a crosscut. Swiveling the arm on the column allows for miter cuts; the maximum range is nearly 90° to the right and 50° to the left.
Tilting the motor and blade makes a bevel cut possible, while rotating the yoke to bring the blade parallel to the fence sets up the machine for a rip cut.
Depending on the width of the stock you need to cut, two types of rip cuts are feasible: an in-rip, with the blade turned closest to the column, and an out-rip, with the blade swiveled farthest away from the column.
Although the blade is kept vertical to the table for most operations, it can also be tilted to operate horizontally. Such a position is particularly useful for tasks such as cutting grooves, finger joints and moldings.
Light and compact enough to move around the shop or travel to construction sits, a portable 8’1/4” radial arm saw can usurp the many roles of a table saw. Fitted with a special bit and equipped with an accessory motor shaft that turns at 18,500 rpm, this model will double as an overhead router.
Radial Arm Saw Uses
- crosscuts
- bevel cuts
- ripping
- compound cuts
- miter cuts
- ripping boards
- dado cuts
- angle cuts
- rabbet cuts
- groove cuts
- cutting finger joints
- cutting moldings
- router with an accessory
What Is A Radial Arm Saw Table
A radial arm saw table is a table that is used to support a radial arm saw. Radial arm saw tables are often made of wood or metal, and they may be either stationary or portable.
Some radial arm saw tables have legs that can be adjusted to different heights, while others have wheels that allow them to be moved around easily. There are many different styles of radial arm saw tables available, so it is important to choose one that will best suit your needs.
When choosing a radial arm saw table, it is important to consider the size of the saw and the type of material you will be using it to cut. If you only need to use the saw for occasional tasks, then a small table might be all you need.
However, if you plan on using the saw for more heavy-duty tasks, then a larger table would be a better choice. It is also important to consider the height of the table and how easy it is to move around. If you will be using the radial arm saw table in a confined space, then it is important to choose one that is easy to move.
Radial Arm Saw Dust Collection
If you have a radial arm saw, then you know that one of the biggest challenges is dealing with the dust. It seems like no matter what you do, there’s always a cloud of sawdust surrounding your work area. But there are some things you can do to help control the problem.
One option is to use a shop vac with a hose attachment. This will help to suck up some of the dust before it has a chance to settle on your work surface. Another option is to use a dust collector. These are designed specifically for dealing with sawdust and can be attached directly to your radial arm saw.
Another way to deal with the problem is to simply work in a well-ventilated area. This will help to keep the dust from settling in your work area and making it difficult to breathe.
Whatever method you choose, just be sure to take some time to deal with the radial arm saw dust problem. It’s not going to go away on its own, but with a little effort, you can get it under control.
What Is A Radial Arm Saw Fence
A radial arm saw fence is a piece of equipment that is used to help guide the blade of a radial arm saw. The fence is attached to the saw so that it can be moved along the length of the blade. The fence helps to keep the blade in a straight line and can also be used to make cuts at different angles.
There are two types of radial arm saw fences: fixed and adjustable. A fixed fence is attached to the saw at one point and cannot be moved. An adjustable fence can be moved along the length of the blade, which allows for more flexibility when making cuts.
When choosing a radial arm saw fence, it is important to consider the type of material that you will be cutting. If you will be cutting softwoods, then a fixed fence is a good option. If you will be cutting hardwoods, then an adjustable fence is a better choice.
It is also important to consider the size of the radial arm saw that you have. A smaller saw will require a smaller fence, while a larger saw will require a larger fence.
The last thing to consider when choosing a radial arm saw fence is the price. Radial arm saw fences can range in price from a few hundred dollars to several thousand dollars. Choose the fence that fits your budget and your needs.
What Are The Parts Of A Radial Arm Saw?
- Arm: Supports yoke, motor and blade.
- Yoke: Holds motor and blade; attached to the arm by a carriage unit with roller bearings that slide along a track underneath the arm.
- Yoke Clamp Handle: Locks yoke in fixed position on arm; released to rotate yoke for ripping.
- Miter Clamp Handle: Locks arm in fixed position on column; released to swivel arm and set miter angle. Locks automatically at preset angles, including 0° and 45° to the right and left.
- On/Off Switch: Removable toggle prevents accidental start-up.
- Yoke Handle: Used to slide yoke along arm for crosscutting.
- Bevel Clamp Handle: Locks motor in fixed position on yoke; released to set bevel angle or to move blade to horizontal position. Locks automatically at preset angles, including 0° and 45°, and 90° to the right and left.
- Blade Guard Clamp Screw: Holds guard in fixed position; loosened to move guard.
- Splitter: Keeps wood kerf from binding during a cut; anti-kickback fingers on each side of splitter prevent workpiece from lifting.
- Elevating Crank: Raises and lowers arm on column to set depth of cut.
- Stand: Supports saw; screw on feet are adjustable to level saw table.
- Blade Guard: Protects operator from upper part of blade; nose tilts to cover leading edge of blade for ripping. Lower blade guard used for crosscutting.
- Column: Supports arm; four setscrews on front of column base and four bolts on rear of column tightened to prevent rotation.
- Rip Clamp Handle: Locks yoke in position on arm for ripping and for some cuts with blade in horizontal position; released for crosscutting.
- Dust Spout: For dust collection system; adjustable nozzle directs dust away from work area.
- Arm Cover: Keeps dust from entering rear part of arm.
- Miter Clamp Adjustment Screw: Turned to adjust tension on miter clamp; hole in arm cover provides access.
- Column Adjustment Bolts: Four bolts control amount of play between column and column base.
- Rear Table
- Table Clamp: Presses rear saw table and spacer flush against fence and front saw table.
- Column Base Cover
- Table Spacer: Removable to allow installation of a wider fence.
- Auxiliary Table: Replaceable hardboard or plywood panel glued to front saw table; blade runs in kerfs cut in auxiliary table.
- Fence: Prevents workpiece from moving during crosscutting; guides workpiece across table for ripping. Owner-installed. Usually set between front and rear tables as shown; positioned behind rear table when cutting wide stock.
- Motor: One end holds blade; opposite end serves as accessory shaft for attaching a variety of accessories.
Subscribe to Jim Howard on Youtube