Subscribe to Daver Made on YouTube
Daver, a woodworking enthusiast, shares his knowledge on how to make last-minute holiday gifts using scrap wood. With the holiday season fast approaching, Daver understands the urgency of finding the perfect gift. In this video, he showcases five different gift ideas made out of scrap wood that are relatively quick and easy to make.
The first gift idea is a chalkboard sign made out of a pallet board. Daver walks through the process of cutting and sanding the board, filling in nail holes, and applying chalkboard paint. The second gift is a dog leash holder made out of a scrap piece of cedar. He demonstrates how to drill holes for the hardware and attach a sawtooth picture frame holder for easy installation. The third gift is a phone stand made out of a 2×4 piece of wood. He explains how to cut and sand the wood, create a slot for the phone, and add picture frame bumpers for stability. The fourth gift is a rustic picture holder made out of pallet boards and trim pieces. Daver shows how to glue and clamp the pieces together and add paper clips for holding photos. The final gift is a beer flight made out of a pallet board, with holes drilled for mini beer glasses. Daver provides tips on how to fill cracks and voids in the wood and attach hardware for easy carrying.
Key Takeaways
- Daver shares five different last-minute gift ideas made out of scrap wood.
- The gift ideas include a chalkboard sign, dog leash holder, phone stand, rustic picture holder, and beer flight.
- Each gift is relatively quick and easy to make, using basic woodworking techniques.
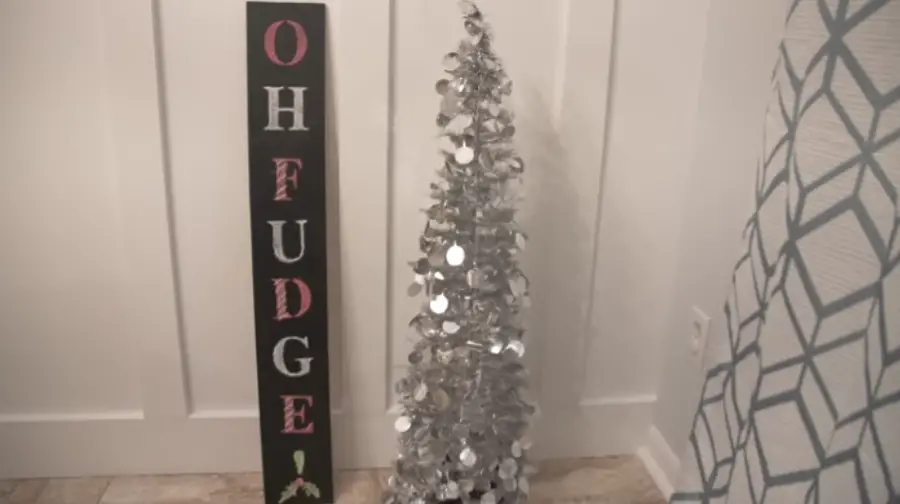
Chalkboard Sign
Materials and Tools
To create a chalkboard sign, one will need a pallet board, a thickness planer, a pocket plane, a random orbital sander, wood filler, American walnut stain, and Valspar black chalkboard paint.
Creating the Sign
First, the pallet board is selected and the ends where the nail holes were cut off. The board is then run through the thickness planer to get it smooth on both sides. The pocket plane is used to cut down the rough edges on the pallet board, and the random orbital sander is used to make it extra smooth. Wood filler is then used to fill the nail holes in the middle of the board. The back of the board is stained using American walnut stain, and two coats of Valspar black chalkboard paint are applied.
Finishing the Sign
Once the paint dries, the chalkboard sign is ready to be chalked on.
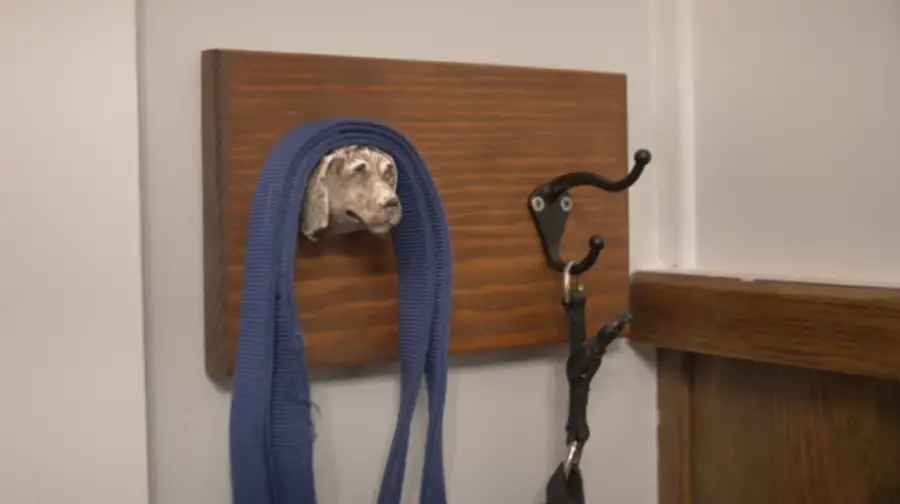
Dog Leash Holder
Materials and Tools
To make a dog leash holder, one would need a scrap piece of wood, a drawer pull, a forstner bit, a hacksaw, a sawtooth picture frame holder, and some picture frame bumpers. Other tools required include a surface planer, a router, a random orbital sander, and a drill.
Creating the Holder
The first step in creating a dog leash holder is to cut the scrap wood to its final length. Next, run it through a surface planer to save time on sanding. Use a router to clean up the edges and make it look nicer. Sand it down with a random orbital sander using 320 grit sandpaper to make it extra smooth. Then, give it a couple of coats of stain. Find a drawer pull at a local craft store and drill pilot holes to attach it to the board. Use a forstner bit to drill a recess for the nut to screw into, and cut any excess off with a hacksaw. Attach a sawtooth picture frame holder to the wall and add some picture frame bumpers to the bottom of the holder.
Finishing the Holder
To finish the dog leash holder, apply some paste wax. It is advisable to put the paste wax on before installing the hardware. The dog leash holder is perfect for any dog owner and is a simple gift that can be made quickly.
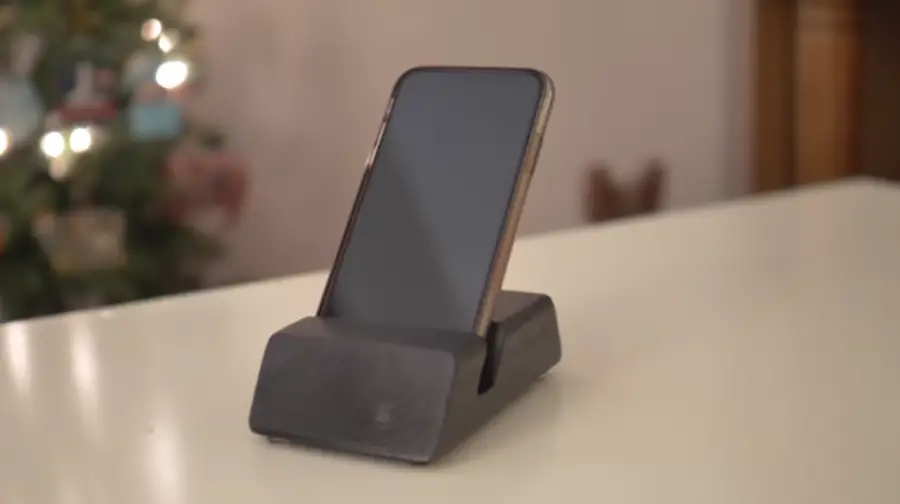
Phone Stand
Materials and Tools
To make a phone stand as a last-minute gift, one will need a 2×4 piece of wood, a saw, a miter saw or table saw, a chisel, a file, sandpaper, paint or stain, and picture frame bumpers.
Creating the Stand
To create the stand, one needs to cut a 50-degree angle into the 2×4 piece of wood. This can be done using a miter saw or table saw. Once the angle is cut, the slot where the phone will sit needs to be flattened out using a chisel and file. Afterward, the entire stand needs to be sanded down. The back of the stand can be cut at an angle as well. Once everything is sanded down, one can paint or stain the stand. It is recommended to use picture frame bumpers on the bottom to protect whatever surface the stand is placed on.
Finishing the Stand
To finish the stand, one can add picture frame bumpers on the bottom to protect whatever surface it is placed on. It is also recommended to use paint or stain to give the stand a finished look.

Rustic Picture Holder
Materials and Tools
To make a rustic picture holder, one will need pallet boards, trim pieces, quick and thick glue, paper clips, rapid fuse super glue, paste wax, wire picture frame holder, and nails. Tools required include a miter saw, random orbital sander, type on glue, and clamps.
Creating the Holder
The first step in creating a rustic picture holder is to cut the pallet boards to size and square them up. Sanding the boards lightly will give them a rustic look. Next, the boards should be stained with American walnut stain for a nice color. Trim pieces can then be used to hold the boards together using quick and thick glue. Once clamped together, the holder should be left to dry. Once dry, paper clips can be added to hold the photos using rapid fuse super glue. Finally, paste wax can be used to finish off the front and a wire picture frame holder can be attached on the back using nails.
Finishing the Holder
The rustic picture holder is a great gift for those who like the rustic look, and is perfect for holding pictures. The holder is sturdy and can hold photos of various sizes. By using pallet boards, the holder has a unique and rustic look that is sure to impress.
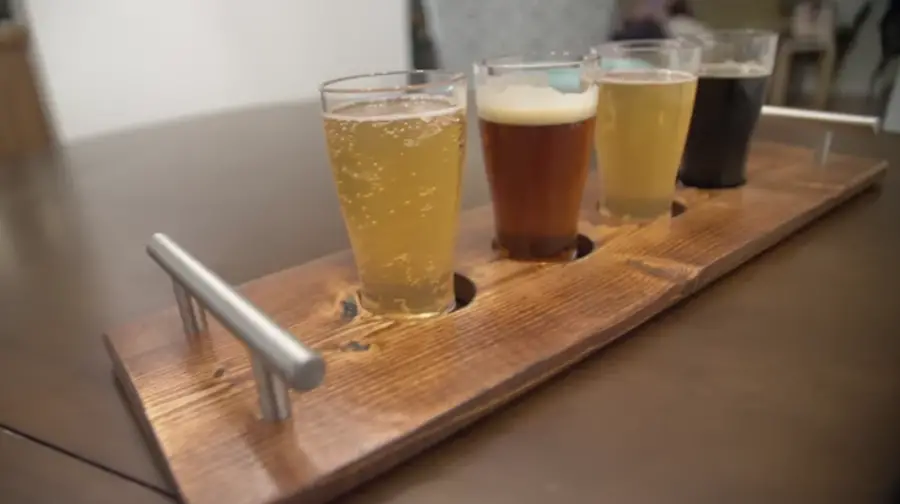
Beer Flight
Materials and Tools
To create a beer flight, one will need a pallet board, mini beer glasses, a two-inch forstner bit, black starbond ca glue, spray shellac, and drawer pulls. Tools required include a miter saw, jointer sled, thickness planer, random orbital sander, and a router.
Creating the Flight
The pallet board needs to be cut down on the miter saw and then placed on the jointer sled to get the top flat. Afterward, it should be put through the thickness planer to get it smooth. The mini beer glasses should then be placed on the board to get the spacing right before drilling the holes using the two-inch forstner bit. If the board is not deep enough for the glasses to sit securely, it can be drilled all the way through. The edges should then be routed to make it look better. Any cracks and voids in the pallet board can be filled with black starbond ca glue to prevent it from cracking further. Once everything is smooth, it can be stained with American walnut stain and then sprayed with shellac. After a couple of coats and sanding in between, the hardware can be attached using drawer pulls.
Finishing the Flight
The beer flight is now ready to use. It can be used to serve a variety of beers, and it is perfect for any beer connoisseur. If desired, one can also make a whiskey flight or a tequila flight by changing the size of the holes depending on the glasses used.