Subscribe to LRN2DIY on YouTube
Looking for some creative ways to use painter’s tape around the house? Look no further! In this article, we’ll explore seven alternate uses for painter’s tape that will make your life easier and your projects more successful.
From tear-out prevention to drill dust containment, caulking guide creation to depth marker for drilling, and even a bonus DIY labels tip, we’ve got you covered. Plus, we’ll reveal the history of painter’s tape and why it’s blue, as well as a technique called “blue and glue” that will blow your mind. So grab a roll of painter’s tape and let’s get started!
Key Takeaways
- Painter’s tape can prevent tear-out and keep things clean while drilling into drywall.
- It makes a great guide for getting perfect caulking lines and for marking measurements.
- “Blue and glue” is a technique that uses painter’s tape and glue to temporarily connect two pieces.
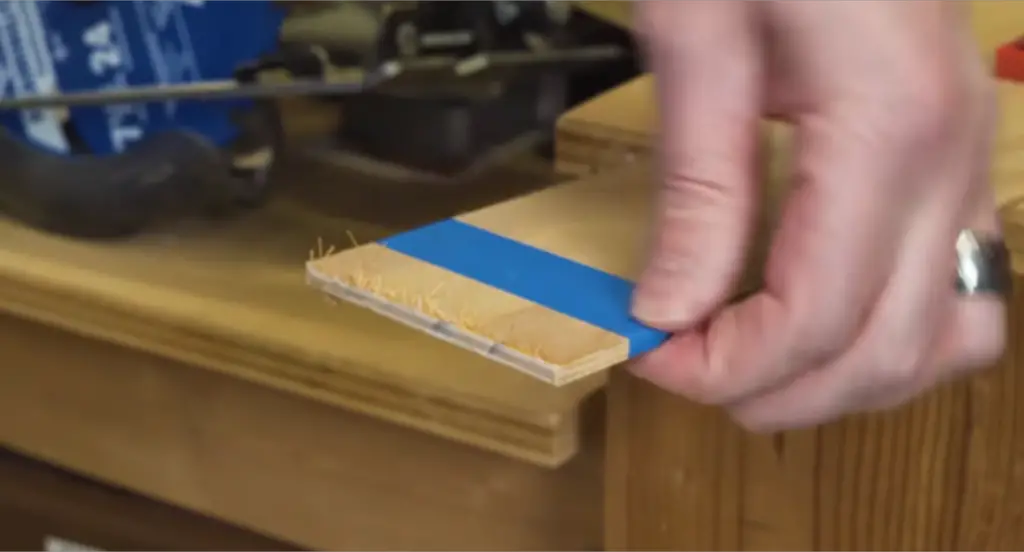
Tear Out Prevention
Tear out is a common problem when sawing wood. It occurs when the saw blade comes up through the surface of the wood, causing splintering. To prevent this, one can use painter’s tape. By placing the tape on the surface of the wood before sawing, the tape helps to prevent tear out. When the saw blade comes up through the surface of the wood, it cuts the tape instead of splintering the wood. Once the sawing is complete, simply remove the tape to reveal a clean cut.
Painter’s tape also has other uses around the house. It can be used to keep things clean while drilling into drywall. By placing a U-shaped tape around the area where the hole will be drilled, the tape catches all the dust and debris, making for an easy clean-up.
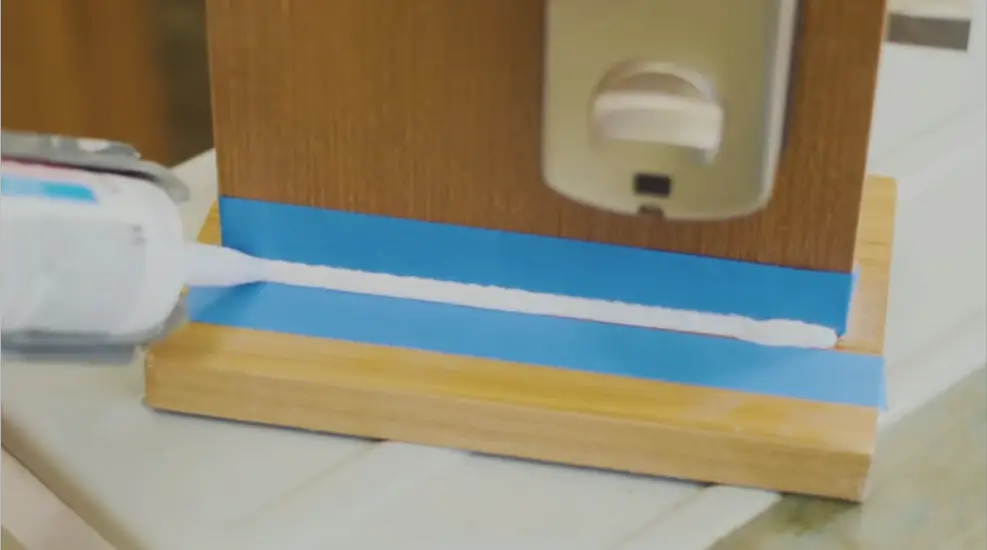
Another great use for painter’s tape is as a guide for getting perfect caulking lines. By carefully laying a guide equidistant from the base and wall, the tape helps to ensure a straight and even line of caulking.
Painter’s tape can also be used to write down measurements on a tape measure. Simply add little strips of blue tape on the tape measure and write down the measurements as you make them. This helps to keep track of your measurements and ensures accuracy.
If you’ve ever wondered why painter’s tape is blue, it’s because 3M trademarked the color to stand out from other colors of paint.
Painter’s tape can also be used to ensure the correct depth when drilling. By placing a piece of tape on the drill bit at the desired depth, it acts as a guide and prevents drilling too far.
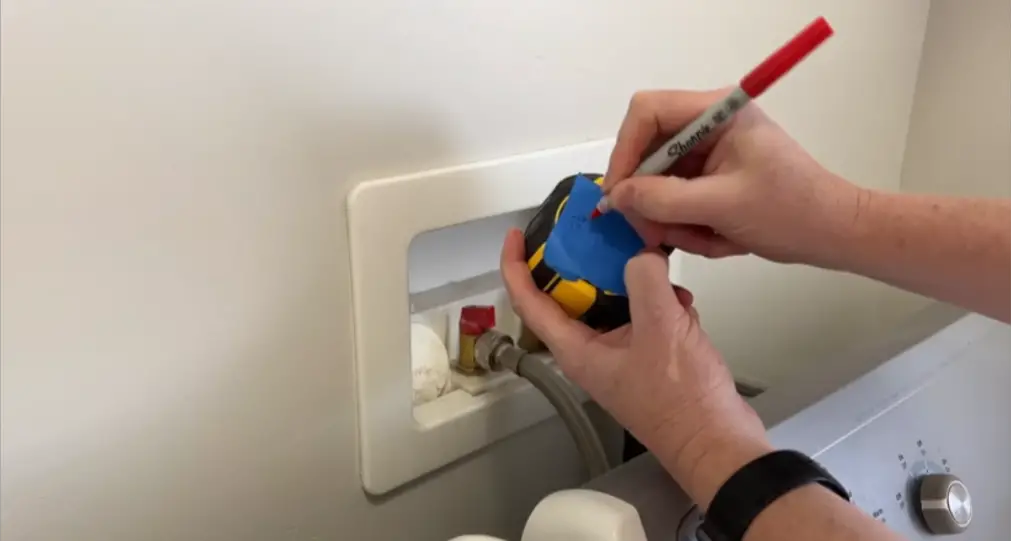
Lastly, painter’s tape can be used as a label for paint cans. By writing down the color and date of when the paint was used on a piece of tape, and placing it on the light switch cover plate, you can easily keep track of the paint used in each room.
In summary, painter’s tape is a versatile tool that can be used in many ways around the house. From preventing tear out to ensuring accurate measurements, it’s a must-have for any DIY enthusiast.
Want To Improve Your Woodworking?
Discover 1,000 Hours Of Step-By-Step Woodworking Videos

It’s called Woodwork101. A database of detailed videos and blueprints in crystal clear, mouth-watering HD that will take you by the hand and show you that DIY home projects done the right way are easy, fun, and always of top quality… turning dream into reality in a heart-beat. Getting you that perfect build each and every time.

Drill Dust Containment
Painter’s tape is not just for painting. It has many other uses that can help with various tasks around the house. One of the most useful ways to use painter’s tape is for drill dust containment. When drilling into drywall, a small pocket can be made using a U-shaped tape to catch all the powder and wood chips that come out of the hole. This will keep the work area clean and prevent the dust from spreading around the room.
Painter’s tape was invented by 3M in 1988 as a successor to masking tape. Unlike masking tape, painter’s tape does not leave any sticky residue. It is also trademarked by 3M with its distinctive blue color, which is easy to spot among other colors.
Another way to use painter’s tape is to create a guide for getting perfect caulking lines. By carefully laying a nice guide on the base and wall, an equidistant amount away, using painter’s tape, a perfect line can be achieved. After applying the caulking, the tape can be removed while it is still wet, leaving a perfect line.
Painter’s tape can also be used to create small labels or stickers for things in the kitchen or around the house. Cutting up a low roll of painter’s tape into small pieces can provide a bunch of small stickers or labels for various purposes.
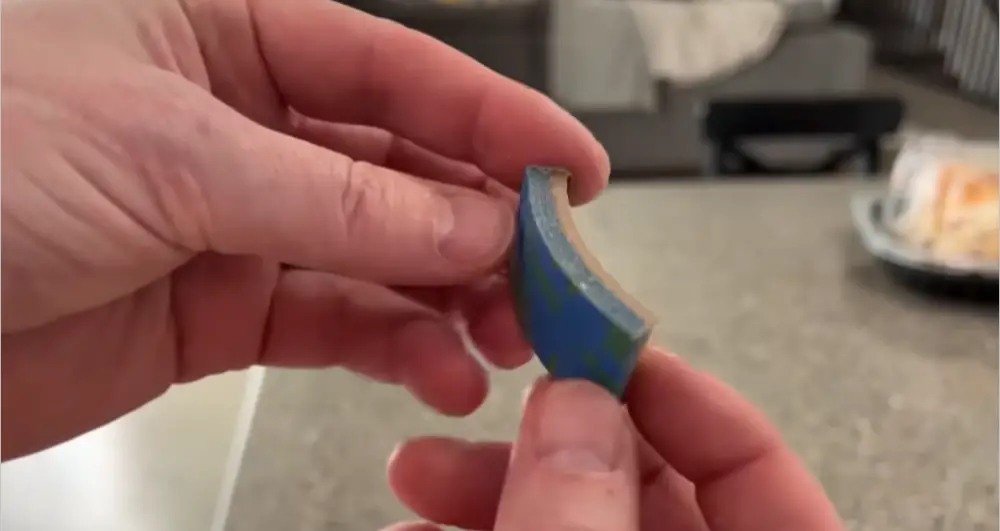
Lastly, painter’s tape can be used to temporarily connect two pieces using glue. This technique is called blue and glue and is a great way to move things quickly. By applying glue to one surface and spraying the other with accelerator, the two surfaces can be bonded together temporarily. When ready to remove them, a standard chisel can be used to pry them apart.
In conclusion, painter’s tape is a versatile tool that can be used for more than just painting. Its uses include drill dust containment, creating perfect caulking lines, making small labels or stickers, and temporarily connecting two pieces using glue.
History and Residue Removal
Painters tape has come a long way since its inception in 1988 by 3M, the same company that invented masking tape. Unlike its predecessor, painters tape doesn’t leave behind any sticky residue, making it a popular choice for various household tasks. Here are some humorous alternate uses for painters tape that can help you out around the house:
- Tear Out Prevention: Painters tape can help prevent tear-out, which occurs when saw blades come up through the surface of the wood. By placing a bit of painters tape on the surface, the saw blade won’t cause tear-out, resulting in a clean cut.
- Clean Drilling: To keep things clean while drilling into drywall, place a couple of pieces of painters tape in a U-shape to catch all the powder and wood chips that come out.
- Perfect Caulking Lines: Painters tape makes a great guide for getting perfect caulking lines. Carefully lay a nice guide an equidistant amount away on the base and wall, then push it down and make sure it’s on there good and tight. Apply the caulking, and while it’s still wet, remove the tape for a perfect line.
- Measurement Reminder: Adding little strips of blue tape on your tape measure to write down your measurements as you make them can help you remember the measurements later. Tape the piece of tape with its measurement right onto the board so you know exactly which measurement that board is.
- Drill Depth Control: To control the depth of a drill bit and prevent drilling too far, place the drill bit, line it up with the edge of a ruler, for example, take a bit of tape and put it right on the desired depth. Create a little flag, and as soon as the flag starts clearing away the wood chips, you’re all set.
- Paint Information: Before putting back the light switch cover plate, take a piece of painter’s tape and write down any information you need to about the paint and the date that you painted. You can place that right in the middle of your switch plate.
- Blue and Glue: Use some of this blue tape to temporarily connect two pieces that you can then remove later, whenever you’re ready. Use super glue and a bit of moisture or Cyanoacrylate glue and accelerator to bond the two surfaces. Pry them apart with a standard chisel when you’re ready to remove them.
[Video] 3 Most Common Mistakes
When Setting Up Shop

A woodworking friend of mine shared this video by Ralph Chapman with me that helped him set up his workshop.
The video explains the benefits of Ralph Chapman’s guide about setting up an affordable workshop and avoiding the most common mistakes offers to anyone interested in woodworking.
Caulking Guide Creation
Painter’s tape has many alternate uses apart from just masking off areas while painting. Here are some humorous tips to help you out around the house:
- Use painter’s tape to prevent tear out while sawing wood. Place the tape over the area where the saw blade will come up through the surface of the wood. This will prevent the wood from splintering and tearing out.
- Keep things clean while drilling into drywall by placing a U-shaped piece of painter’s tape around the area where you’re drilling. This will catch all the powder and wood chips, keeping your workspace clean.
- Painter’s tape makes a great guide for getting perfect caulking lines. Carefully lay a nice guide an equidistant amount away on the base and wall, apply the caulking, and remove the tape while the caulking is still wet.
- Add little strips of blue tape on your tape measure to write down your measurements as you make them. You can even tape that piece of tape with its measurement right onto the board to remember which measurement that board is.
- Use painter’s tape to mark the exact depth on your drill bit. Place your drill bit, line it up with the edge of a ruler, and put a bit of tape right on that quarter. Create a little flag and you’re good to go.
- Before you put your cover plates back on after painting, take a piece of painter’s tape and write down any information you need to about the paint and the date that you painted. You can place that right in the middle of your switch plate.
- Use a role of painter’s tape to create small stickers or labels for things in the kitchen or just labels around the house.
Bonus tip: Use some blue tape and glue to temporarily connect two pieces that you can then remove later, whenever you’re ready. Super glue and moisture or Cyanoacrylate glue and accelerator are great options for this.
Remember, painter’s tape is not just for painters anymore. It has become an essential tool for DIY enthusiasts and homeowners alike.
Measurement Marking
Painter’s tape is not just for painting anymore! Here are some alternative uses for painter’s tape that can help you out around the house:
- Prevent Tear-Out: Saw blades can cause tear-out on wood surfaces, but painter’s tape can help prevent this issue. Simply apply a bit of painter’s tape on the surface of the wood before cutting to avoid tear-out.
- Keep Clean While Drilling: When drilling into drywall, use painter’s tape to create a pocket that catches all the dust and debris.
- Perfect Caulking Lines: Use painter’s tape as a guide to create perfect caulking lines. Place the tape equidistant from the base and wall, apply the caulking, and remove the tape while it’s still wet.
- Write Down Measurements: Add little strips of blue tape on your tape measure to write down your measurements as you make them. You can even tape the piece of tape with its measurement right onto the board.
- Drill to the Exact Depth: Use painter’s tape to mark the exact depth you want to drill. Line up the drill bit with the edge of a ruler, put a piece of tape on the quarter-inch mark, and create a little flag. When the flag clears away the wood chips, the hole is drilled to the exact depth needed.
- Label Paint Colors: Before putting the cover plates back on your light switches, place a piece of painter’s tape on the back and write down the paint color and date it was painted.
- Blue and Glue: Use painter’s tape and glue to temporarily connect two pieces. Simply apply glue to one side and tape to the other, and press them together. When you’re ready to remove them, use a chisel to pry them apart.
These creative uses for painter’s tape can save you time and effort in your DIY projects. Plus, with its trademark blue color, you won’t mistake it for any other tape in your toolbox.


Depth Marker for Drilling
When it comes to drilling, it’s important to know the exact depth you need to drill to avoid drilling too far. Fortunately, there’s a simple solution: painters tape. By following these easy steps, you can ensure your drill bit only goes as deep as you want it to:
- Line up your drill bit with the edge of a ruler.
- Place a piece of painters tape on the ruler at the depth you want to drill.
- Create a little flag by folding the tape over itself.
- Attach the tape to the drill bit, making sure the flag is visible.
- Begin drilling.
- Stop drilling when the flag reaches the surface of the material.
With this simple trick, you can avoid drilling too deep and ensure your project turns out just the way you want it to. Plus, you’ll have a perfectly marked depth without any measuring or guesswork involved. So next time you’re reaching for your drill, don’t forget the painters tape!
Paint Information Storage
Painters tape is not just for painting anymore! Here are some alternate uses for painters tape that can help you out around the house:
- Prevent Tear Out: Prevent tear out on wood by applying painters tape on the surface before cutting. This helps the saw blade cut through the tape first, resulting in a clean cut without any tear out.
- Keep Things Clean: Keep things clean while drilling into drywall by creating a little pocket with painters tape. This will catch all the powder and wood chips, making it easier to clean up later.
- Perfect Caulking Lines: Use painters tape to create a guide for getting perfect caulking lines. Carefully lay the tape an equidistant amount away on the base and wall, apply the caulking, and remove the tape while the caulking is still wet.
- Label Measurements: Add little strips of blue tape on your tape measure to write down your measurements as you make them. Tape the piece of tape with its measurement right onto the board to keep track of all your measurements.
- Depth Control: Use painters tape to control the depth of your drill bit. Place your drill bit, line it up with the edge of a ruler, for example, take a bit of tape and put it right on the desired depth. Create a little flag to mark the depth, and drill away!
- Paint Information Storage: Before putting the cover plates back on after painting a wall, take a piece of painter’s tape and write down any information you need to about the paint and the date that you painted. You can place that right in the middle of your switch plate.
- Blue and Glue: Use some blue tape and glue to temporarily connect two pieces that you can remove later. Apply glue to one side and moisture to the other, and press the two pieces together. This is a great technique for temporarily holding two pieces together.
These are just a few of the many uses for painters tape. So, next time you’re in a fix, think outside the box and see how painters tape can help you out!
Bonus: DIY Labels
In addition to its many household uses, painters tape can also be used to create DIY labels. When running low on tape, simply cut it into small pieces to create a bunch of small stickers or labels that can be used around the house, particularly in the kitchen.
Not only is this a great way to label items, but it also adds a touch of creativity to everyday organization. Plus, it’s a fun activity for kids and adults alike.
So next time you’re in need of some labels, grab a roll of painters tape and get creative!
[Guide] How To Launch Your Woodworking Business For Under $1000


Click Here To View
If you’re considering turning your woodworking hobby into a part-time business check out this helpful guide on how to get started.

Blue and Glue Technique
The Blue and Glue Technique is a handy trick to temporarily connect two pieces using some blue tape and glue. To prep the surfaces, simply place some blue tape on one surface and another piece of blue tape on the other surface. Then, apply some glue to one of the surfaces.
There are two options for glue. The first option is to use super glue and a bit of moisture. Apply some moisture to one side of the surface and apply super glue to the other side. Make sure to use the traditional liquidy super glue, not the gel type. The moisture acts as an accelerator to help bond the surfaces immediately.
The second option is to use Cyanoacrylate glue (CA) and accelerator. Apply some glue to one side of the surface and spray accelerator on the other side. Make sure to avoid getting accelerator on the glue. When the two surfaces are placed together, they will react and bond.
After the surfaces are connected, they can be pried apart using a standard chisel. The Blue and Glue Technique can also be used to temporarily hold the blue tape together, allowing it to be placed on another surface to glue it on there temporarily.
This technique is a great way to connect two pieces temporarily and can be removed when they are no longer needed. It’s a humorous and practical tip that can be useful for various DIY projects.