Subscribe to Matthew Peech on YouTube
The “Art Of Woodworking” Guide Plus 40 Project Plans
Click Here to Download Your Free Copy of The “Art Of Woodworking” Guide
Are you tired of cluttered workbenches with wasted space? Look no further! In this article, we’ll be exploring how to transform your ordinary workbench into a storage solution that will make your life easier. Our humorous guide will take you step by step through the process of designing and constructing a storage box that fits snugly under your workbench.
From cutting and preparing box sides to drilling holes for assembly, our guide will provide you with all the information you need to create a functional and practical storage solution. With easy-to-follow instructions and a touch of humor, you’ll be able to assemble your storage box without breaking a sweat. So, let’s get started and transform your workbench into a clutter-free haven!
Key Takeaways
- Learn how to transform your workbench into a practical storage solution.
- Follow step-by-step instructions to cut and prepare box sides, assemble the storage box, and create the mounting plate.
- Construct brackets for the final assembly and enjoy your clutter-free workbench.
Designing Storage Solutions
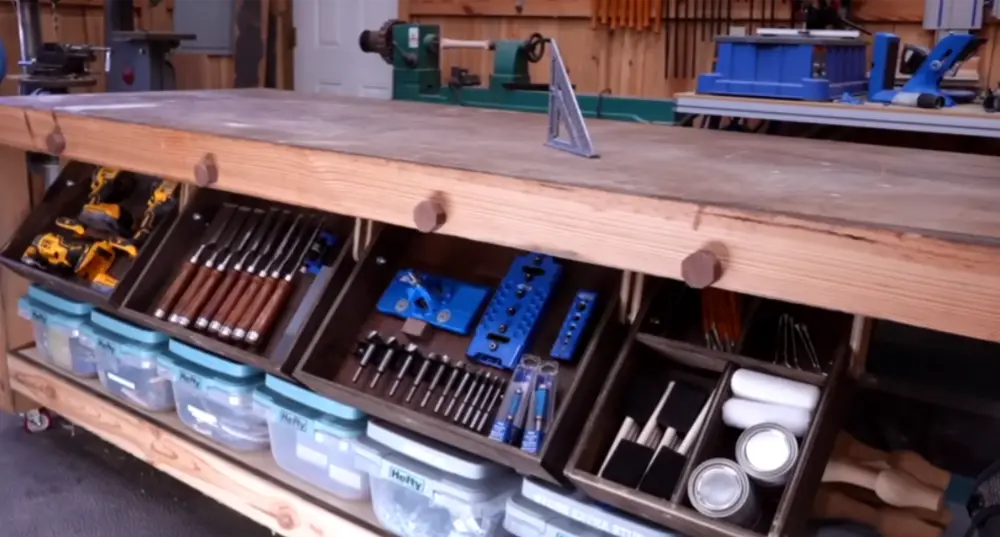
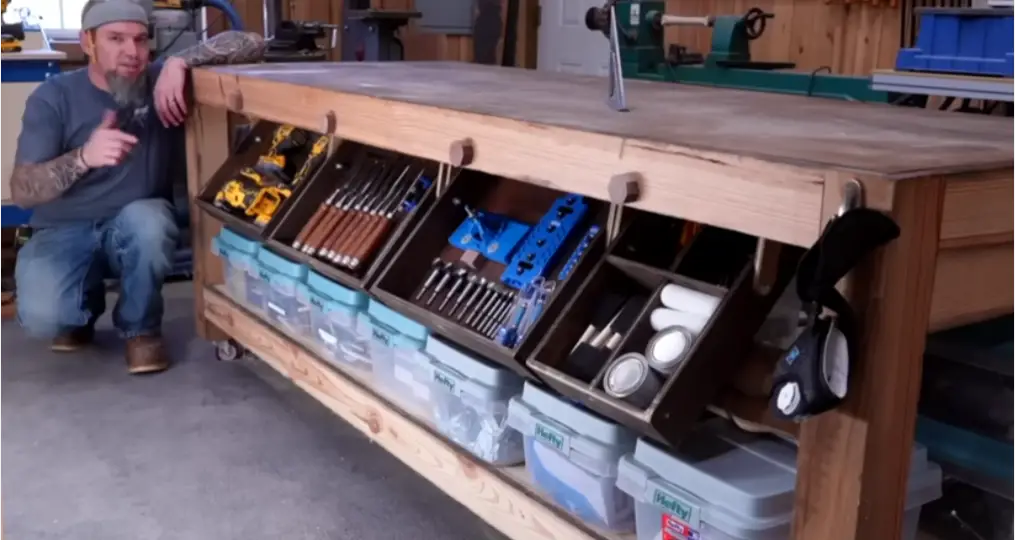
Our intrepid DIY enthusiast has been on a mission to optimize storage solutions for workshops and garages. One of the biggest issues with workbenches is the wasted space around the aprons. In this video, the host shares step-by-step instructions on how to transform a normal workbench into a storage powerhouse.
To begin, the host recommends cutting parts for the sides of the box. These can either be 2in or 3in, depending on the size of the tools you plan to store. For the sides, the host suggests using a half-inch plywood. Once the sides are ripped down, cut them to the desired length.
For the front and back of the box, the host recommends using a 20in board, while for the sides, a 15 1/2 in board is ideal. Two of each board will be needed. The width of 20in was chosen because most bar magnets are 18in long, making it easy to mount a magnet to the bottom of the box.
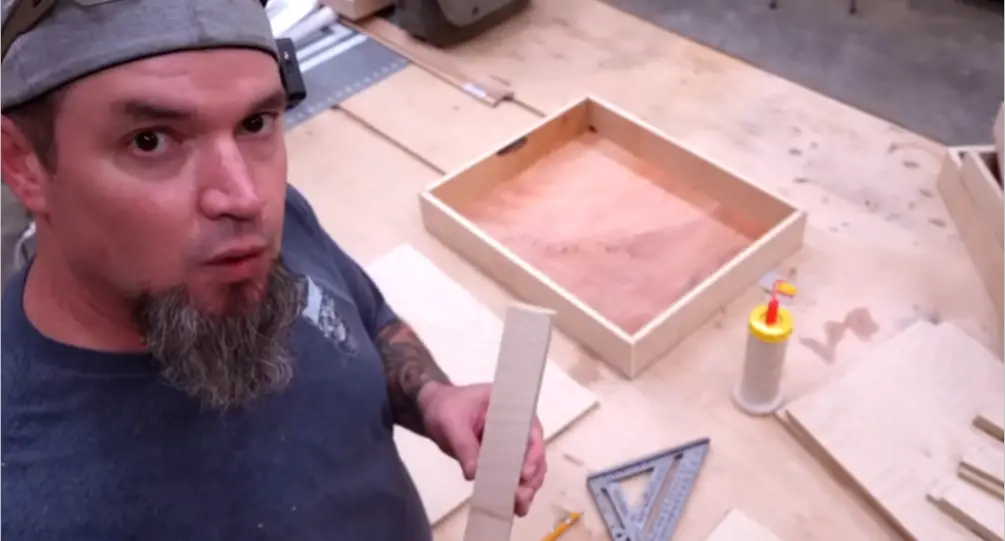
Once the box sides are assembled, the next step is to create a bottom for the box. The size of the bottom will depend on the material used, but it should be around 16 1/2 by 20. The host made the bottom out of a 1/4 inch plywood and attached it directly to the frame using wood glue and brad nails.
To mount the box, the host recommends creating a mounting plate that will connect underneath the workbench and to the box. This requires two 12in boards that are 1in by 2in and a board that is 12in wide by 19in long. The boards need to be drilled with 1/4in holes before being attached to the sides of the box using wood glue and brad nails.
The next step is to create the brackets that will allow the box to open and slide forward before shifting back in and locking. Two sets of brackets will need to be made, each made from 1 3/8in material. Two brackets that are 6in long and two that are 7 3/8in long are required. Once the brackets are cut, drill 1/4in holes in the center of each end and round the edges to prevent any sharp edges from hitting the top of the table.
The final step is to attach the brackets to the top support mount and the storage box. This is done by placing the support on top of the storage box and attaching the brackets to the back of the support using an inch and a half hex head bolt with a washer. The lock nut should be left loose to allow for adjustments.
With these simple steps, anyone can transform their workbench into a storage powerhouse. Happy DIY-ing!
Cutting and Preparing Box Sides
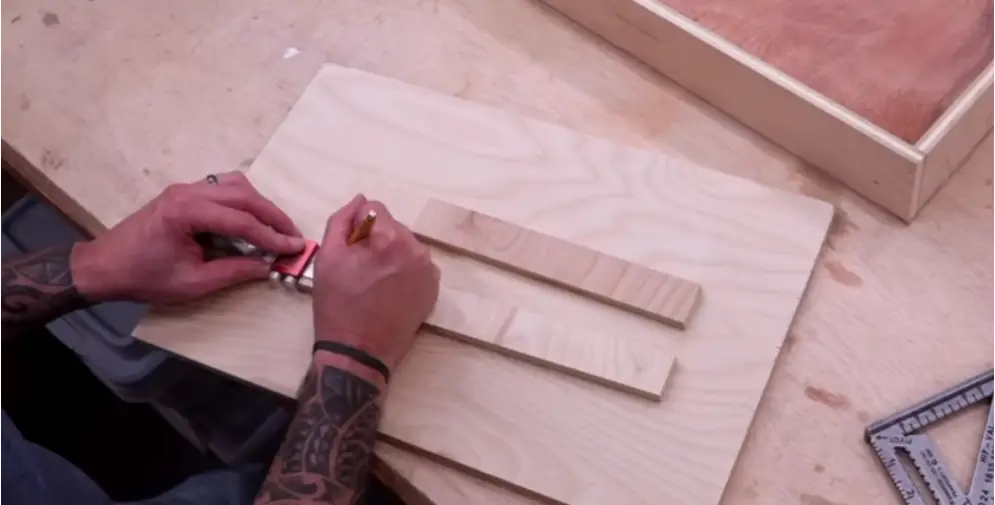
In this section, our expert woodworker will guide you through the process of cutting and preparing box sides for your workshop storage solution. He’s not a fan of wasted space around the aprons of workbenches, so he’s come up with a solution to transform your normal workbench into a more efficient storage space.
To start, you’ll need to decide on the size of your box sides. Our expert suggests using either a 2-inch or 3-inch width, depending on the size of the tools you want to store. For this demonstration, he’ll be using a 3-inch width made from half-inch plywood.
Once you have your sides ripped down to the appropriate width, it’s time to cut them to length. For this particular storage box, you’ll need two different size boards for the front and back. The front and back will require a 20-inch board, while the sides will require a 15 1/2-inch board. You’ll need two of each of these boards.
The reason for using a 20-inch board for the front and back is to accommodate most bar magnets, which are typically 18 inches long. If you want to include a bar magnet in the bottom of your box, this size will work perfectly.
To assemble the box, all you’ll need is wood glue and Brad nails. However, if you prefer to use screws, you certainly can. Our expert doesn’t believe they’re necessary, but it’s up to you.
Once you’ve assembled the box, it’s time to move on to the bottom. The size of your bottom will depend on the thickness of your material. For a half-inch plywood, you’ll need a bottom that’s approximately 16 1/2 by 20 inches. If your material is a different thickness, you’ll need to adjust accordingly.
To install the bottom, our expert suggests putting glue around the frame and nailing it directly to the frame. However, if you want a cleaner look, you can cut a groove into all of your box sides and assemble them around the bottom. You can even cut a rabbit around the inside of the side parts and assemble it that way. Just keep in mind that the dimensions will be slightly different if you choose either of these styles.
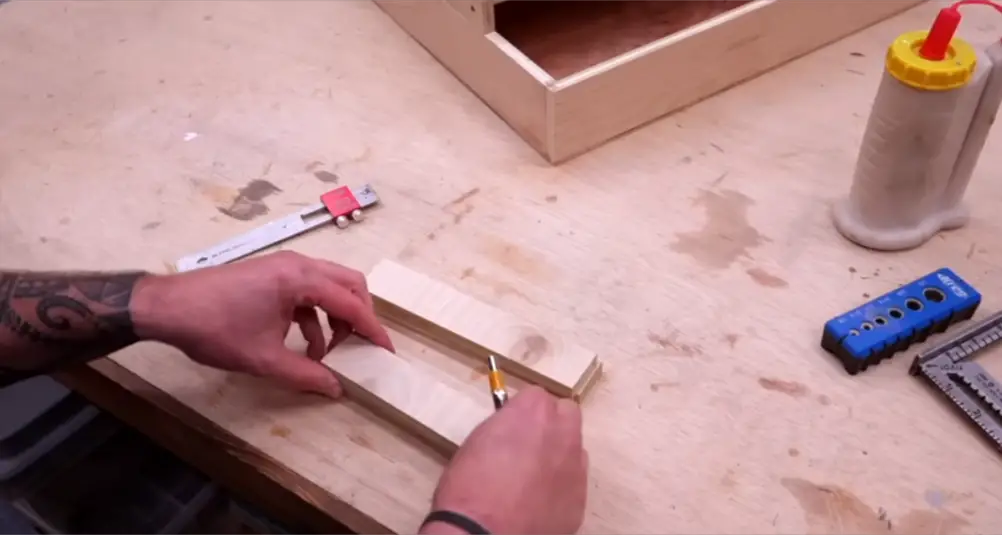
With the box assembled, it’s time to move on to the mounting plate. This is the part that will connect underneath your workbench and to your box. You’ll need two boards that are 12 inches long by an inch and a half, as well as a board that is 12 inches wide by 19 inches long.
Before you attach the boards, you’ll need to drill some holes. From this point on, all of the holes will be 1/4 inch, as our expert will be using 1/4 inch bolts to assemble the mounting plate. To start, he measures 1 inch in from the back and 5/8 of an inch up from the bottom. The second hole will be 7 and 7/8 inches from the back and 3/4 of an inch up from the bottom.
Once the holes are drilled, our expert rounds the edges over to keep them from hitting the top of the table when the compartment is opened. He suggests using a sander or jigsaw for this step.
With the brackets finished, it’s time to drill some holes in the short side of the box. The first hole will be 1 inch in from the back and 1 inch down from the top. The second hole will be 6 and 1/2 inches from the back and 1 and 1/4 inches down from the top.
To connect the brackets to the top support mount and the storage box, simply place the support on top of the storage box and place it towards the front. Then, attach the back bracket to the back of the support bracket using an inch and a half hex head bolt with a washer. Leave the lock nut loose to allow for adjustments. Finally, attach the opposite end to the back of the support bracket using the same bolt and washer. Repeat the process for the front bracket.
And there you have it! Your very own workshop storage solution. Stay tuned for more woodworking tips and tricks from our expert.

Assembling the Storage Box
In this section, we will learn how to assemble the storage box for our workbench. Our expert designer has found that there is a lot of wasted space around the aprons of the workbench, and has come up with a solution to transform a normal workbench into a storage solution.
To start, we will need to cut the parts for the sides of the box. Depending on the size of the tools we want to store, we can use either a 2-inch or 3-inch board. Our expert recommends using a 1/2 inch plywood for the sides.
Once the sides are cut, we will need to cut the front and back boards. The front and back boards will be 20 inches long, while the side boards will be 15 1/2 inches long. The reason for the 20-inch width is to accommodate bar magnets, which are typically 18 inches long.
To assemble the box, we will be using wood glue and brad nails. However, if a cleaner look is desired, the sides can be cut with a groove and assembled around the bottom with a rabbit. The bottom should be around 16 1/2 by 20 inches, depending on the thickness of the material used.
Next, we will need to assemble the mount that will connect the box to the workbench. This will require two boards that are 12 inches long by 1 inch and 2 inches wide, as well as a board that is 12 inches wide by 19 inches long. Holes will need to be drilled into the boards to connect them.
To create the brackets that will allow the box to open and slide forward, two sets of brackets will need to be made. These brackets will be made out of 1 and 3/8 inch material and will be 6 inches and 7 and 3/8 inches long. Holes will need to be drilled into the brackets and the short side of the box.
Finally, the brackets can be connected to the top support mount and the storage box using bolts and washers. The lock nut should be left loose to allow for adjustments. With these steps, the storage box for the workbench is complete!
Creating the Mounting Plate
In this section, our DIY expert will guide us through the process of creating the mounting plate for our storage box. He starts by cutting the parts needed for the sides of the box, which can either be 2 inches or 3 inches depending on the size of the hand tools you want to store. The sides are made of half-inch plywood.
Once the sides are ripped down, he cuts them to length, and for this particular storage box, he uses a 3-inch side. However, he notes that the measurements will be the same if you’re building a 2-inch box.
To assemble the box, he uses wood glue and Brad nails, but he mentions that screws can also be used if desired. The bottom of the box is made of ¼ inch plywood, and it’s cut to fit, depending on the size of your material.
Next, he moves on to creating the mounting plate, which will connect the box to the workbench. He uses two boards that are 12 inches long by an inch and a half and a board that is 12 inches wide by 19 inches long. He drills quarter-inch holes in the boards, and then he attaches them to the sides of the 19-inch board using wood glue and Brad nails.
To make the moving parts for the storage box, he creates two sets of brackets, each made of 1 and 3/8 inch material. The brackets are 6 inches and 7 and 3/8 inches long, respectively. He drills quarter-inch holes in the brackets and rounds the edges over to prevent sharp edges from hitting the top of the table when the compartment is opened.
The last set of holes to be drilled is on the short side of the box, where the brackets will be attached. Once the holes are drilled, he attaches the brackets to the top support mount and the storage box using bolts, washers, and lock nuts.
And that’s it! With the mounting plate and brackets in place, our storage box is ready to be installed under the workbench, providing a convenient storage solution for all of our hand tools.
[Video] 3 Most Common Mistakes
When Setting Up Shop

A woodworking friend of mine shared this video by Ralph Chapman with me that helped him set up his workshop.
The video explains the benefits of Ralph Chapman’s guide about setting up an affordable workshop and avoiding the most common mistakes offers to anyone interested in woodworking.
Drilling Holes for Assembly
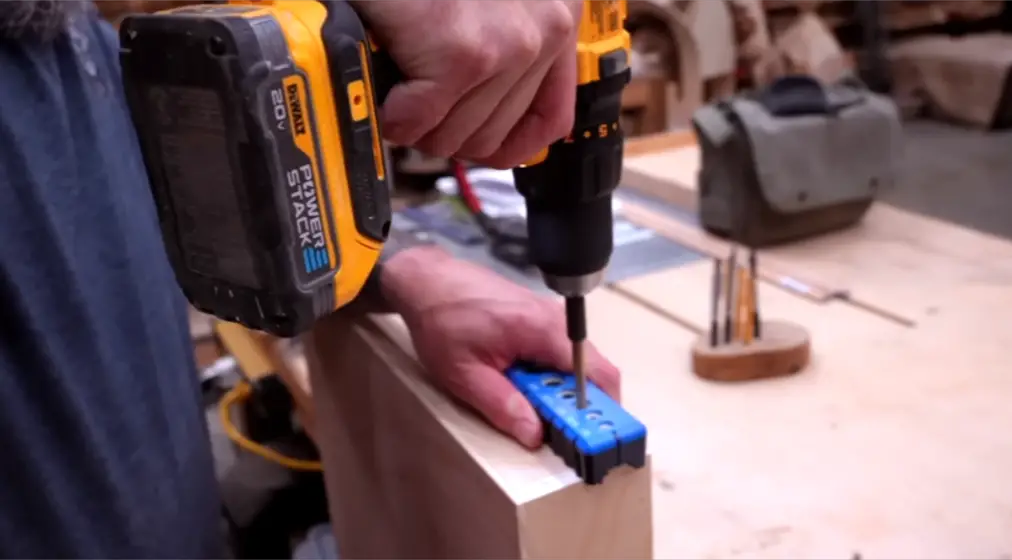
In this step, our DIY enthusiast is going to drill holes for assembly. He is going to use a ¼ inch bit to make holes, which will be used to assemble this storage box. He recommends using a scrap wood piece to start drilling the holes. This will help to prevent the drill bit from walking.
He has marked the back of the boards with a “B” and an arrow pointing towards the 5/8 inch edge. He has measured 1 inch in from the back and 5/8 inch up from the bottom to drill the first hole. For the second hole, he has measured 7 and 7/8 inches from the back and 3/4 inch up from the bottom.
He is going to drill these holes in both boards at once using a hand drill and Craig’s drill guide. Once the holes are drilled, he is going to round the edges over to prevent the sharp edges from hitting the top of the table when the compartment is opened.
He advises making an extra part as a template for drilling holes in several of these storage boxes. This will save time and prevent the need to measure every single one.
With the holes drilled, it’s time to connect the brackets to the top support mount and the storage box. The back bracket will be attached to the inside of the storage box with an inch and a half hex head bolt, a washer, and a lock nut. The lock nut will be left loose to allow for adjustments. The opposite end of the back bracket will be attached to the back of the support bracket using the same bolts and washers.
Constructing the Brackets
In this section, our DIY expert will guide us through the process of constructing the brackets for our storage box. First, we need to cut two sets of brackets, each made of 1 and 3/8 inch material. We will need two brackets that are 6 inches long and two brackets that are 7 and 3/8 inches long.
Once the brackets are cut, we need to drill quarter-inch holes in the center of each bracket, half an inch in from each end, and centered at 11/16 of an inch from the bottom. After drilling the holes, we round the edges over to prevent the sharp edge from hitting the top of the table when we open the compartment.
Our DIY expert recommends making an extra part that can be used as a template for the rest of the brackets if we plan on making several of these storage boxes. This will save us a lot of time and prevent us from having to measure each bracket individually.
With the brackets finished, we only have one more set of holes to drill on the short side of our box. The first hole will be 1 inch in from the back and 1 inch down from the top, and the second hole will be 6 and 1/2 inches from the back and 1 and 1/4 inches down from the top.
Now it’s time to connect the brackets to our top support mount and storage box. We will place our support on top of the storage box and towards the front. Then, we will install our back bracket using an inch and a half hex head bolt with a washer on it. We will place the bolt through the back hole on the inside, place a third washer, and then a lock nut. We will leave the lock nut loose to allow for adjustments.
Finally, we will attach the opposite end of the back bracket to the back of our support bracket using the same bolts and washers. We will repeat this process for the front bracket, and our brackets will be complete.
[Guide] How To Launch Your Woodworking Business For Under $1000


Click Here To View
If you’re considering turning your woodworking hobby into a part-time business check out this helpful guide on how to get started.
Final Assembly
In this step, our workshop storage solution is starting to take shape. Matthew Peech begins by cutting the parts needed for the sides of the box. Depending on the size of the tools you want to store, you can choose between a 2-inch or 3-inch box. The sides are made of half-inch plywood.
Once the sides are ripped down, he proceeds to cut them to the desired length. For the front and back, they use a 20-inch board, and for the sides, a 15 1/2-inch board. The reason for the 20-inch width is that most bar magnets are 18 inches long.
He then assembles the box using wood glue and Brad nails. However, they mention that screws can also be used if desired. The bottom of the box is made of a 1/4-inch plywood and is cut to fit.
To connect the box to the workbench, he creates a mounting plate. Two boards, 12 inches long and 1 inch by 2 inches wide, are needed, as well as a board that is 12 inches wide and 19 inches long. He drills quarter-inch holes in the boards and attaches them using wood glue and Brad nails.
Matthew Peech then creates two sets of brackets, both made of 1 3/8-inch material. Two brackets are 6 inches long, and two are 7 and 3/8 inches long. The brackets are then drilled with quarter-inch holes and the edges are rounded over to prevent sharp edges.
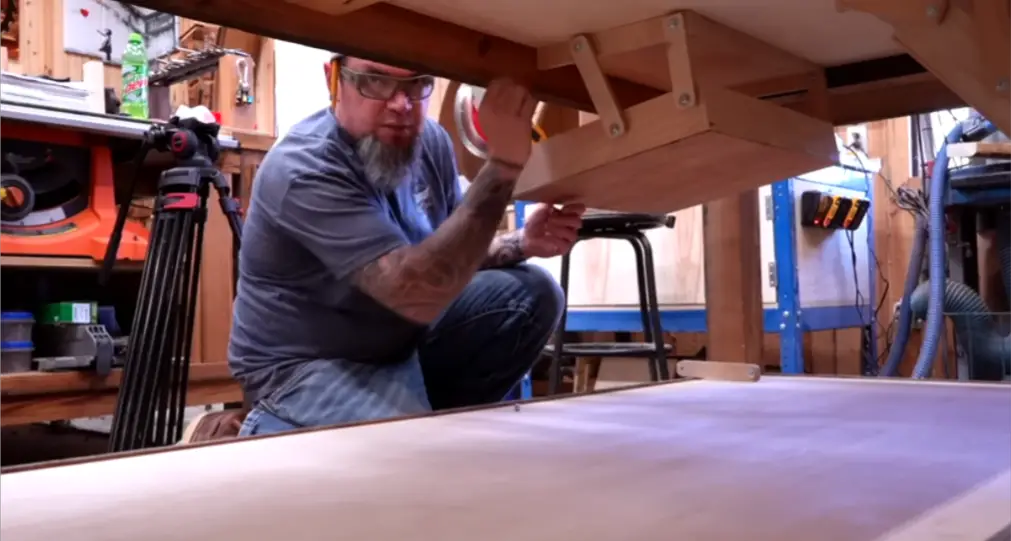
The final step is to connect the brackets to the top support mount and the storage box. The support is placed on top of the box towards the front, and the back bracket is attached using an inch and a half hex head bolt with a washer on it. The opposite end is then attached to the back of the support bracket using the same bolts and washers. The lock nut is left loose to allow for adjustments.
With the brackets securely attached, the storage solution is complete and ready to use.