There are many ways to fill screw holes in wood. Some of them work better than others, and some require more preparation than others do. The following article will go over how to fill a hole with glue for those who don’t want any sanding or scraping involved.
Method One: Fill the Hole with Glue
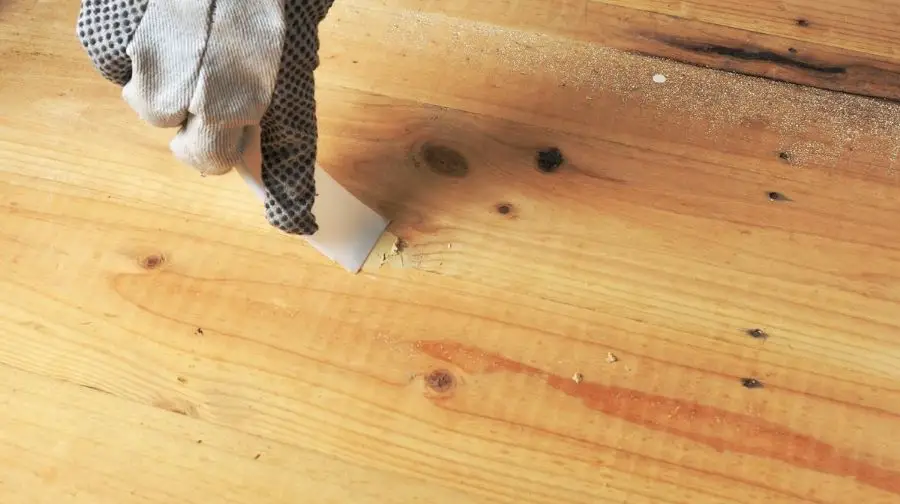
The first way to fill a hole is with wood glue. Wood glue can be easily applied, adheres quickly, and holds well. However, it will shrink slightly over time after it dries, so some sanding may still need to happen if you want an even surface that’s flush with what was around it before screwing in the board.
Step One: Clean Out the Hole
First, clean out any residue or extra bits of wood that are sticking up from inside the hole with a wire brush to ensure it’s as clean as possible before you apply glue. Also, sand around the edges where there may be rough spots, so they’re smooth again.
Step Two: Apply the Glue
To apply the glue, use a putty knife or something else with a blunt edge to fill the hole up as much as possible. If there’s any leftover on the surface after you’ve filled the hole, wipe it off with a damp cloth.
Step Three: Let It Dry and Sand
When the glue is dry (usually within an hour), give it a light sanding until it’s level with the surface around it. You may need to do a little more sanding if there are any noticeable bumps or ridges.
Method Two: Fill the Hole with Spackling Paste
Another way to fill screw holes is with spackling paste, which can be bought at most hardware stores. The paste is a good option for holes that are bigger than the screw head, and it dries quickly so you can move on to the next step.
Step One: Apply the Spackling Paste
Squeeze some of the spackling paste into a bowl and use a putty knife or your fingers to apply it to the hole. Make sure to fill it up as much as possible and get into all the nooks and crannies.
Step Two: Let It Dry
After you’ve applied the paste, let it dry for about 15-20 minutes. Once it’s dry, give it a light sanding with some fine-grit sandpaper until it’s level with the surface around it.
Method Three: Use a Resin-Based Filler
If you’re looking for a more durable option, resin-based fillers can be used to fill screw holes. These usually come in a tube and are easy to apply. They also dry quickly so you can move on to the next step.
Step One: Squeeze Some Filler into a Bowl
Use a putty knife to squeeze some filler into a bowl and use your fingers or another tool with a blunt edge to apply it inside the hole, making sure there are no gaps between wood and filling. Make sure you get as much in as possible and fill it up.
Step Two: Let It Dry
Give the filler a few hours to dry before sanding it down with some fine-grit sandpaper until there are no bumps or ridges left, then clean off any extra residue with a damp cloth. If necessary, you can apply another coat of resin after this to make sure the hole is completely filled.
Discover 1,000 Hours Of Step-By-Step Woodworking Videos

It’s called Woodwork101. A database of detailed videos and blueprints in crystal clear, mouth-watering HD that will take you by the hand and show you that DIY home projects done the right way are easy, fun, and always of top quality… turning a dream into reality in a heartbeat. Getting you that perfect build each and every time.
Method Four: Use a Silicone-Based Filler
Silicone-based fillers are another option for filling screw holes and come in a tube or can. They’re easy to apply, but you should avoid using them on unfinished wood as they can cause discoloration over time.
Step One: Apply the Filler
Squeeze some of the filler into a bowl and use your fingers or another tool with a blunt edge to apply it inside the hole, making sure there are no gaps between wood and filling. Make sure you get as much in as possible and fill it up.
Step Two: Let It Dry
Give the filler a few hours to dry before sanding it down with some fine-grit sandpaper until there are no bumps or ridges left, then clean off any extra residue with a damp cloth. If necessary, you can apply another coat of silicone after this to make sure the hole is completely filled.
Method Five: Use a Putty Knife
This is the most basic way to fill screw holes and doesn’t require any special tools or materials. All you need is a putty knife and some wood glue.
Step One: Apply Wood Glue
Squeeze some of the wood glue into a bowl and use the putty knife to apply it to the hole. You can also use a toothpick or something else with a pointed end to get into tight spaces.
Step Two: Let It Dry and Sand
When the glue is dry (usually within an hour), give it a light sanding until it’s level with the surface around it. If there are any noticeable bumps or ridges, you may need to do a little more sanding.
Method Six: Use Wood Putty
Wood putty is another option for filling screw holes in wood, and it dries quickly so you can move on to the next step. Like spackling paste, its main advantage is that it’s easy to find at most hardware stores.
Step One: Apply the Putty
Use a putty knife to apply the putty to the hole, making sure to fill it up as much as possible and get into all the nooks and crannies.
Step Two: Let It Dry
After you’ve applied the putty, let it dry for about 15-20 minutes. Once it’s dry, give it a light sanding with some fine-grit sandpaper until it’s level with the surface around it.
Method Seven: Use a Wood Filler
If you’re looking for a more durable option than spackling paste or wood putty, you can use a wood filler. These usually come in a tube or can and are easy to apply.
Step One: Apply the Filler
Step Two: Let It Dry
Give the filler a few hours to dry before sanding it down with some fine-grit sandpaper until there are no bumps or ridges left, then clean off any extra residue with a damp cloth. If necessary, you can apply another coat of filler after this to make sure the hole is completely filled.
[Video] 3 Most Common Mistakes
When Setting Up Shop

A woodworking friend of mine shared this video by Ralph Chapman with me that helped him set up his workshop.
The video explains the benefits of Ralph Chapman’s guide about setting up an affordable workshop and avoiding the most common mistakes offers to anyone interested in woodworking.
Method Eight: Use a Resin-Based Filler
Resin-based fillers are a more expensive option, but they’re also more durable and can be used on unfinished wood.
Step One: Apply the Filler
Step Two: Let It Dry
Method Nine: Use a Caulking Gun
Caulking guns are an easy way to apply caulk, which can be used to fill screw holes in wood.
Step One: Apply the Caulk
Squeeze some of the caulk into a bowl and use the caulking gun to apply it to the hole. You can also use a toothpick or something else with a pointed end to get into tight spaces.
Step Two: Let It Dry and Sand
When the caulk is dry (usually within an hour), give it a light sanding until it’s level with the surface around it. If there are any noticeable bumps or ridges, you may need to do a little more sanding.
Step Three: Wipe Away Excess Caulk
Use a damp cloth or paper towel to remove any excess caulk and avoid getting it on anything that it shouldn’t touch, like the surrounding wood of other objects in your room. If necessary, give the area another cleaning with a dry cloth to remove any residue from the dampness of your towel.
Method Ten: Use Wood Putty and Sandpaper
Wood putty can be used in combination with sanding for an easier way to fill screw holes in wood.
Step One: Apply the Filler, Let It Dry, and Sand
Squeeze some putty into a bowl and use your fingers or another tool with a blunt edge to apply it inside the hole, making sure there are no gaps between wood and filling. Make sure you get as much in as possible and fill it up. Let everything dry overnight before sanding down any bumps or ridges, then clean off any excess putty with a damp cloth and dry it off again.
Step Two: Apply Wood Putty or Spackling Paste, Let It Dry, and Sand Again
This step is optional if you don’t feel like your wood filler didn’t do the job on its own (for example, there are still some ridges visible or it’s not completely level), but you can always give your putty or spackling paste another tries. Apply more of the wood filler and let it dry overnight before sanding down any bumps or ridges again, then clean off any excess with a damp cloth.
Step Three: Clean Up Any Excess Filler or Paste
Use a dry cloth to wipe away any excess wood filler or spackling paste and avoid getting it on anything that it shouldn’t touch, like the surrounding wood of other objects in your room. If necessary, give the area another cleaning with a damp cloth to remove any residue from the dryness of your towel.
Step Four: Apply a Finishing Product
If you’re happy with the way your screw hole looks, apply a finishing product like paint or sealant to protect it from moisture and further damage.
No matter which method you choose, always make sure the filler is completely dry before moving on to the next step, so you don’t end up with an uneven surface. And if you’re not happy with how it looks, keep trying until you get it right – filling screw holes in wood are definitely a trial-and-error process!
The Fastest Way To Fill Screw Holes In New Wood
Subscribe to Painting and Decorating on Youtube
How To Fill Screw Holes with Wood Filler
You can use wood filler to fill screw holes in wood. Fill the hole completely with filler, or you can also apply two coats of it for better results.
How To Fill Screw Holes in Wood Furniture
When using a drill, make sure that your bit is not too big so as not to split the wood when drilling into it. If there are already pilot holes in the furniture, use those as your guide.
[Guide] How To Launch Your Woodworking Business For Under $1000


Click Here To View
If you’re considering turning your woodworking hobby into a part-time business check out this helpful guide on how to get started.
How To Fill Screw Holes in Wood Door
When filling screw holes on a door, you can either use wood filler or caulk. If you’re using wood filler, make sure to fill the hole completely and then give it a light sanding before applying a finish.
How To Fill Screw Holes in Wood Siding
To fill screw holes in wood siding, you can either use caulk or spackling paste. If using caulk, make sure to clean off any excess after it’s dried and sand the surface smooth before applying a finish like paint.
Hide A Screw | Easy to Fill Wood Holes
Subscribe to Woodworking Ideas on Youtube
How To Fill Screw Holes in Wood Before Painting?
If you’re filling screw holes in wood before painting, use a filler that is compatible with the paint you will be using. Make sure to clean off any excess after it’s dried and sand or scrape down ridges, so your finish goes on smoothly.
How To Fill Screw Holes in Wood Before Staining?
When filling screw holes in wood before staining, use a filler that is compatible with the type of stain you will be using. For example, if you are using an oil-based stain, use an oil-based filler. Make sure to clean off any excess after it’s dried and sand or scrape down ridges, so your finish goes on smoothly.
How to Apply Wood Filler to Fill Nail Holes
Subscribe to SawsHub DIY Woodworking Tips on Youtube
How To Fill Screw Holes in Wood to Re-Screw
If you’re filling screw holes in wood to re-screw, use a filler with the same type of thread. Make sure your drill bit is not too big and that it matches the fillers’ threads when drilling into it.
Step One: Apply Wood Putty or Spackling Paste, Let It Dry, and Sand Again
This step is optional if you don’t feel like your wood filler didn’t do the job on its own (for example, there are still some ridges visible or it’s not completely level), but you can always give your putty or spackling paste another tries. Apply more of the wood filler and let it dry overnight before sanding down any bumps or ridges again, then clean off any excess with a damp cloth.
Step Two: Clean Up Any Excess Filler or Paste
Use a dry cloth to wipe away any excess wood filler or spackling paste and avoid getting it on anything that it shouldn’t touch, like the surrounding wood of other objects in your room. If necessary, give the area another cleaning with a damp cloth to remove any residue from the dryness of your towel.
Step Three: Apply a Finishing Product
How To Fill Screw Holes in Wood Cabinets
Caulk works best to fill screw holes in wood cabinets. When using caulk, make sure that your hole is free of dust and dirt so it will adhere better when applying the caulking into that area.
How To Fill Screw Holes in Wood Stains
If you’re filling screw holes in the wooden stains, make sure that your filler is compatible with the type of stain you will be using and apply one coat only (light sanding before applying a second coat makes it optional).
How To Fill Screw Holes in Wood Deck
When filling screw holes in the wood deck, you can either use spackling paste or caulk. If using caulk, make sure to clean off any excess after it’s dried and sand the surface smooth before applying a finish like paint.
How Do You Polyfill a Screw Hole?
Using a polyurethane adhesive can be much more effective than standard glues because they tend to dry faster and hold better.
6 Ways to Plug or Fill Pocket Holes
Subscribe to Fix This Build That on Youtube
How Do You Fill a Screw Hole That Is Too Big?
When the screw hole is too big for a standard wood filler, then you can always try filling it with caulk first before applying your polyurethane adhesive to ensure that you get an even fill all around.
What Do You Do When a Screw Won’t Hold?
If you are having trouble getting your screws to hold in the wood, then it might be because the hole is not prepped correctly. Make sure that you clean out the hole with a screwdriver or a drill bit before inserting the screw. This will help to create a better grip and prevent the screw from slipping out.
There you have it! If your screw holes are not as filled as they should be, then try using a filler that is compatible with the type of stain you will be using to fill those pesky empty spaces.
Recommended Posts:

