A Mortise-and-Tenon joint is a common method that wood workers use to join two pieces of wood together at a 90-degree angle. There are so many varieties of wood joints you can use. Each style has a specific purpose and function that separates it from the others.
It can be confusing for a beginner to understand what all of the woodworking joints do so I researched through the internet and put together a quick summary on what mortise and tenon joints are used for.
What is a mortise and tenon joint used for? A Mortise and Tenon joint is commonly used for tables, chairs, doors, beds, windows, frames, cabinets, paneling and any other kind of furniture. It comprises both a mortise (hole) and a tenon (tongue insert piece) to create a bond between two pieces of wood mainly to connect 90-degree right angles.
Keep reading below to get a more in-depth look at mortise and tenon joints and what they are used for.
What Is A Mortise And Tenon Joint Used For?
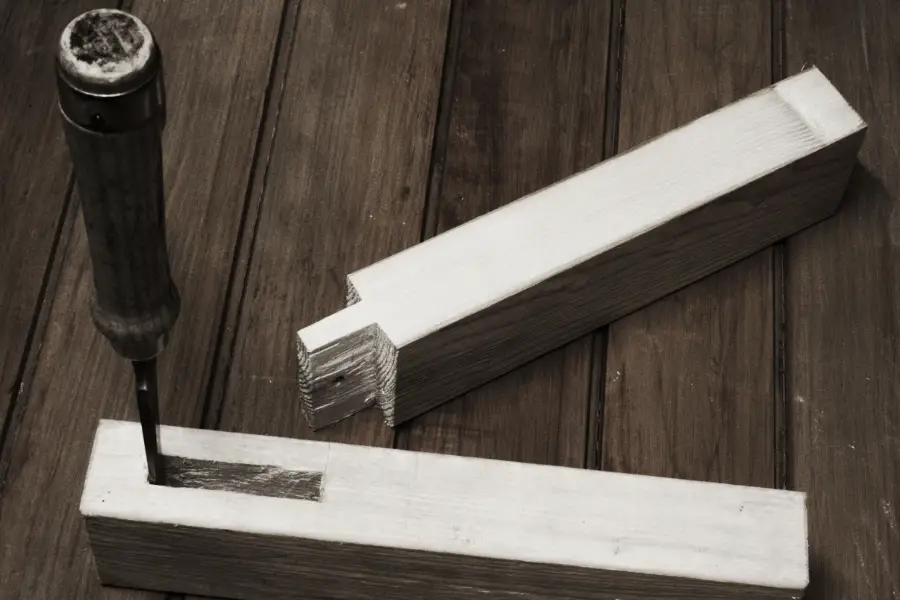
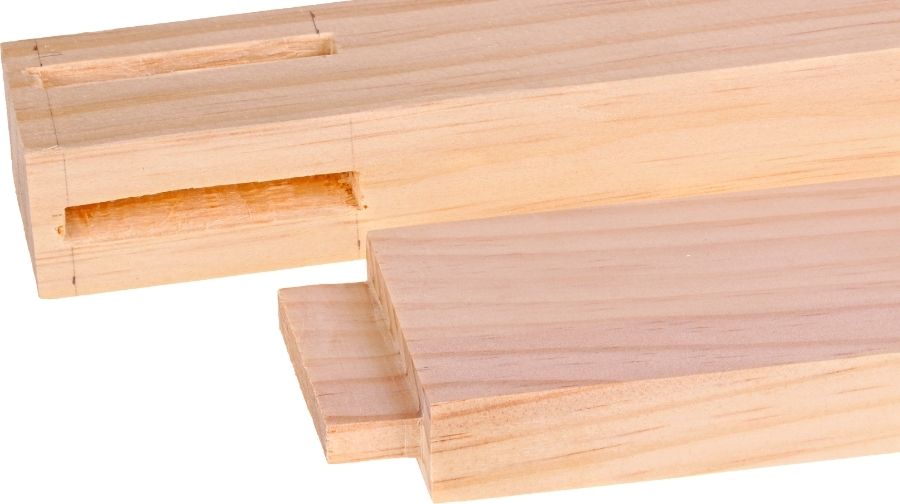
A mortise-and-tenon joint comprises both a mortise (hole) and a tenon (tongue insert) to create a bond between two pieces of wood. Starting out with the tenon, there is the cheek which protrudes out of the edge of the stock piece of wood, with four shoulders around it. The mortise is a four sided hole for the tenon to fit into, which ultimately will create the bond between the pieces of wood.
In a typical mortise and tenon joint, the tenant is about one-third the size of the overall piece of wood. Cutting at this size will make the tenon reasonably strong. It will also leave enough wood material around the four sided mortise hole to keep the joint strong.
People use mortise and tenon joints for any woodworking project that requires joining pieces of wood together at a 90-degree angle. This includes things like tables, chairs, windows, frames, cabinets, paneling and many other woodworking projects.
Mortise And Tenon Joint Uses
- tables
- chairs
- doors
- beds
- windows
- frames
- cabinets
- paneling
- any other kind of furniture
How Do You Cut A Mortise And Tenon Joint With A Router?
A router table can be a brilliant tool for cutting a mortise and tenon joint of up to a ¼” width. If your mortise has to be larger than ¼”, it would be easier to use a plunge router. Before you get started at the router table, mark the mortise location on a piece of wood using a pencil. You should mark on the face opposite of where the mortise will go so it is visible when you are cutting.
To start off, set an appropriate height for your router bit. Position your fence so you can see the mortise on the workpiece. Start by sliding a square piece of scrap wood along the flutes of your router. When finished, you can transfer both edges of that bit onto your fence. The left line will be your start line, and the right line will be your stop line. You can now lock your fence in place.
Clamp a quarter inch piece of plywood to your router table. You can now align the left end of your mortise according to the pencil lines that you drew with the starting line. Put your work piece onto the spinning router bit and maintain pressure along the fence.
Keep working the peace forward until the right end of your mortise aligns with the finish line. You can now shut off your router bit, remove the workpiece from the table when the router bit allows you to do so, and remove the piece of plywood from the workspace.
To cut the tenon, start by marking a tenon outline with a pencil on the end of a test piece of wood. Align your straight bit so that the top of its cutting-edge is consistent with the bottom of your tenon outline. Move your fence so that the straight bit cuts out your tenon. If the tenant turns out to be too thick, raise your straight bit to cut more material. Remember that since you are cutting on both sides, halve the amount you want to take off.
If done correctly, you should be able to fit the tenon into the mortise with just your hands or if necessary with a little help from a mallet. Once inserted there should be enough friction so that when lifted both pieces move together.
To finish the tenon, place the rail on its edge and cut the top and bottom shoulders. If you would like to, you could use a bench chisel or rasp to round the corners of your mortise and Tenon to give it a more professional look.
Subscribe to GuysWoodshop on Youtube
What Are The Advantages Of A Mortise and Tenon Joint?
Using a mortise and tenon joint can be a brilliant tool for things that need a sturdy frame. This includes things like windows, doors, and beds. Once you have glued the joints, they will create a powerful bond that will not move around, thus making them very sturdy.
How Strong Is A Mortise and Tenon Joint?
Woodworkers consider the mortise and tenon joint to be one of the most powerful joints to connect pieces of wood at a 90-degree angle. While mortise and tenon joints may not be as strong and visually appealing as dovetail joints, they still create a powerful bond that can be crafted and depended on by beginners and more advanced woodworkers alike.
Woodworking Tip:
Woodworkers, such as chairmakers who depend on mortise-and-tenon joints, sometimes keep a dehumidifier in their shop to make it drier than the surrounding environment. Once inside the shop, wood shrinks slightly. When a completed project is returned to normal humidity, the tenons swell in the mortises, making the joints tighter and stronger.
Do You Glue Mortise And Tenon Joints?
Whether you glue a mortise and tenon joint comes down to the discretion of the woodworker and the project involved. There are two different factors to consider before you glue your mortise and tenon joint together, so let’s consider those.
To start off, evaluate how tightly your mortise and tenon joint fits together. If made well and they create a tight fit, it is likely that you won’t need glue to keep the pieces of wood joined. Conversely, if your mortise and tenon joint is loose fitting, then it can benefit you to glue the pieces together so they do not move around after being assembled.
Another thing to consider is what the ultimate use will be for this mortise and tenon joint. If you will be using it to assemble something that would benefit from easy disassembly, then you should try to make your mortise and tenon joint as tightly fitting as possible and avoid gluing it together. This way, you can still pull the two pieces of wood apart somewhat easily and disassemble the ultimate product into smaller pieces if need be.