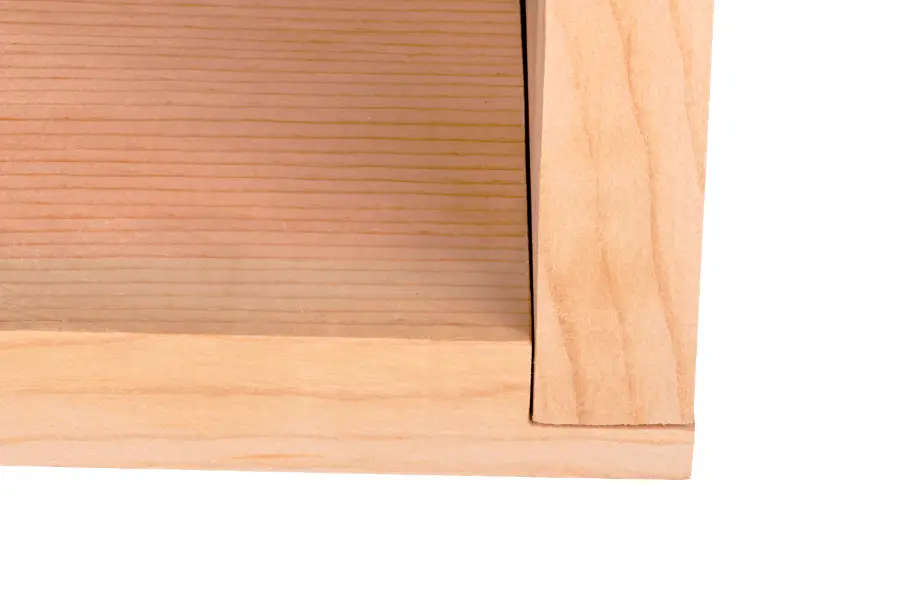
A rabbet joint is created by joining a workpiece edge with an L-shaped notch cut out with another workpiece to create an edge or right angle corner. If you’ve ever stopped to marvel at the ingenious craftsmanship involved in the design of a simple wooden cabinet or chest of drawers with its reinforced outer edges, then chances are you’ve encountered what’s called a Rabbet Joint.
What is a rabbet joint used for? The rabbet joint is a dado or groove cut on the edge of your workpiece used for connecting the back, side, or top of furniture pieces, cabinets, drawer faces and anything you want to connect with a smooth edge.
Keep reading below to get a more in-depth look at Rabbet Joints and what they are used for.
What Is A Rabbet Joint Used For?
A Rabbet Joint is a fundamental technique for any woodworker or woodworking enthusiast. The rabbet or rebate is a groove cut into the edge of a piece of wood to create a lip. Rather than creating a butt joint where, essentially, two pieces of wood are just nailed, screwed, or bracketed together at their edges, an L-shaped groove is cut into one or both pieces of wood at their edges. This lip can also be inserted into a corresponding groove or dado, similar to a tongue-and-groove joint.
Cutting a rabbet or rebate into the edge of the board or panel is a simple way to strengthen the joint of your piece. It not only creates a sturdier finished product but offers a more polished and professional look.
How To Cut A Rabbet
Here are the steps to cut a rabbet joint using a router:
First, set the depth of cut on your router. For a Rabbet joint, you will want to set the router to cut about half way through the thickness of the work piece.
Next, use a straight edge guide to guide the router along the perimeter of your work piece.
Be sure to make several passes with the router, taking shallow cuts each time, until you have reached the desired depth.
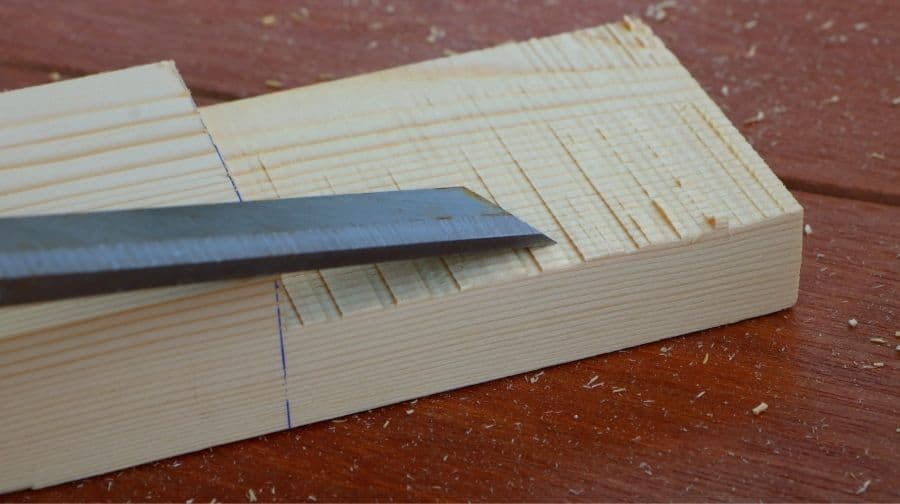
Once the Rabbet is cut, use a chisel to clean up any rough edges.
1/4 Inch Shank Rabbet Router Bit with 6 Bearings Set, SellyOak Multi Rabbeting Router Bit Set for Multiple Depths (1/8″, 1/4″, 5/16″, 3/8″, 7/16″, 1/2″ Interchangeable and Adjustable Bearings)

Click Here To Check The Price On Amazon
Here are the steps to cut a rabbet joint using a dado blade on a table saw:
First, set the blade height on your table saw. For a Rabbet joint, you will want to set the blade to cut about half way through the thickness of the work piece.
Next, use the miter gauge to guide the work piece through the blade.
Be sure to make several passes with the saw, taking shallow cuts each time, until you have reached the desired depth.
Once the Rabbet is cut, use a chisel to clean up any rough edges.
The Mibro Group 416381 8″ Carbide Stacking Dado Blade Set

Click Here To Check The Price On Amazon
Here are the steps to cut a rabbet joint using a rabbet plane:
First, you need to make sure that the rabbet plane is set for the depth of cut that you want. To do this, loosen the adjusting knob and move the blade until it is at the correct depth. Then, tighten the knob to secure the blade in place.
Next, you will need to mark out the Rabbet on the workpiece. To do this, you can use a pencil or a Rabbet Marker. Once the Rabbet is marked out, you can start cutting it with the Rabbet Plane.
Start by holding the Rabbet Plane in your dominant hand and positioning it at the start of the Rabbet cut. Then, push the plane forward with a smooth, even stroke. Keep the plane level as you push it forward to ensure a consistent cut.
As you get closer to the end of the Rabbet, you may need to adjust your grip on the Rabbet Plane. This will help you keep the plane level as you finish cutting the Rabbet.
Once the Rabbet is cut, you can use a chisel to clean up any rough edges. To do this, hold the chisel in your dominant hand and position it at the start of the Rabbet cut. then, strike the chisel with a mallet to remove any rough edges.
Repeat these steps for the other side of the Rabbet Joint.
AKURI Rabbet Plane for Woodworking 12mm Adjustable Double Side Blade

Click Here To Check The Price On Amazon
What Is A Dado Blade?
A Dado blade is essentially a blade attachment for a table saw that allows you to stack multiple blades into the table saw that allows you to cut a wider path through your material rather than a single blade-width.
You will need a scrap board to use as a fence. There is no need to have a fancy fence piece because this is a sacrificial fence. Your dado blade should actually cut into the edge of your fence material the slightest bit, the reason for this is to ensure that your rabbet is as flush with the edge as you can get it. You want to remove all material from the edge to create that quintessential L-shape groove on the edge.
While the table saw makes quick work of cutting the rabbet, you will want to use a push-paddle or a gripper to apply an even amount of pressure across the material. Because you’re cutting away more material than a single-blade cut, the power of the table saw tends to want to push up on the front, middle, or back end of the material, resulting in an uneven depth across the rabbet.
Once you’ve run your edge across the dado blade, you should have the rough outline of your rabbet. To finish it off and make certain that everything is perfectly flat, you’ll want to take your piece over to the worktable and run planer over the new groove. We recommend using a router plane or a shoulder plane for this job. You can plane off the excess material before fitting your joint together or try to fit it together and find the trouble spots that way.
What Is The Best Way to Make a Rabbet Joint
Subscribe to How You Can Make It on Youtube
How To Connect A Rabbet Joint
There are several ways to use a rabbet to great effect in making joints in your pieces. You can cut a single rabbet in one board or panel to accommodate the uncut edge of the piece you’re joining it with. You can cut a rabbet into both pieces of the joint and create what’s known as a double rabbet. Another great way to use a rabbet would be to cut a rabbet into one piece and insert the resulting lip into a groove or dado cut into the other piece.
Regardless of which method you choose, the Rabbet Joint is one of the most essential joints a woodworker can learn, and it is highly effective in many different construction situations.
You can learn more about What A Dado Joint Is Used for by clicking on the blue link to read our article about it.
Also for more details on How To Make Rabbets, Dadoes, and Grooves With A Table Saw Or Router click to read this article on our website.
How To Make A Rabbet Joint
Subscribe to WOOD magazine on Youtube
Rabbet Joints Vs. Dado Joints
The difference between a rabbet and dado joint is the depth of the groove.
A dado is a square- or rectangular-shaped groove cut into the surface of a board that another board can fit into. Rabbets are shallower, only removing material from the edge of a board. This means that dados are stronger than rabbets, but rabbets are easier to create.
Dado joints are used when two pieces of wood need to be joined together perpendicularly. Rabbet joints are used for joining the ends of two boards together, or for attaching a board to the side of another board. Rabbet joints can also be used for fitting a drawer into a cabinet.
Basic Rabbet Joint
A basic rabbet joint is simply two pieces of wood, often referred to as Rabbets, that are joined together at right angles.
The rabbet can be cut into the edge or end of each board using a variety of methods including a router, saw, rabbet plane or chisel. This is the most common type of rabbet joint and is used in everything from cabinetry to picture framing.
Double Rabbet Joint
A double rabbet joint is simply two rabbets cut into each piece of wood that will be joined. It is used when joining two pieces of wood at right angles, such as when making a picture frame.
To make a double Rabbet Joint, you will need to use a Rabbeting bit in your router. This type of bit has a bearing on the outside that will guide the cut along the edge of the wood.
You will need to make two cuts, one on each piece of wood that you are joining. The depth of these cuts will be determined by how thick your Rabbeting bit is.
Once you have made the two rabbets, you can glue and clamp the pieces of wood together. This type of joint is very strong and can be used in a variety of woodworking projects.
Mitered Rabbet Joint
A mitered rabbet joint is made by joining two pieces of wood at a 45 degree angle. This type of joint is commonly used for picture frames, door frames, and window frames.
The mitered rabbet joint is stronger than a butt joint because it has more gluing surface area. It is also easier to make than a mitre joint because you don’t need to cut a precise angle.
To make a mitered rabbet joint, you will need:
– A table saw
– A miter box
– A chisel
– Wood glue
First, use the table saw to cut a Rabbet on one of the pieces of wood. Then, use the miter box to cut a 45 degree angle on the other piece of wood. Fit the two pieces together and clamp them in place.
Use the chisel to clean up any rough edges where the Rabbet meets the miter cut. Then, apply wood glue to the joint and allow it to dry overnight.
Dado Rabbet Joint
A dado rabbet joint is essentially two rabbet joints that are perpendicular to each other. This type of joint is often used to join the sides of a drawer box or cabinet door.
Dado Rabbet Joints are very strong and provide a lot of stability to the overall structure. However, they can be difficult to align properly and require precise measurements. If you’re not careful, the dado rabbet joint can be very weak.
There are two main types of dado Rabbet Joints:
-The through dado Rabbet Joint is where the Rabbets are cut all the way through the wood. This type of joint is often used for joining cabinet doors or drawer fronts.
-The stopped dado Rabbet Joint is where the Rabbets are only cut part way through the wood. This type of joint is often used for joining the sides of a cabinet or drawer box.
Basic Anatomy of a Rabbet Joint
The basic anatomy is pretty simple: a rabbet is a slot or notch cut into the edge or end of a board. Rabbets can be cut into the face of a board as well, but that’s not as common. A rabbet joint is formed by joining two boards together at their rabbets.
Rabbets are one of the most versatile joints in woodworking. They can be used to join boards edge-to-edge, end-to-edge, or even face-to-face. Rabbets can also be used to create lap joints, T&G (tongue and groove) joints, and many other variations.
Most rabbet joints are cut with a table saw or router. Rabbets can also be cut by hand, but it’s not as easy.
Rabbet Joint Milling Techniques
The milling techniques for rabbet joints are not much different than for any other type of joint. The main difference is in the size and shape of the rabbet bit.
Rabbet bits come in many sizes, but the most common are ¼ inch, ½ inch, and ¾ inch. The depth of the rabbet can also vary, but is typically between ⅛ inch and ¼ inch.
To mill a rabbet joint, the first step is to set the depth of the Rabbet bit. This is done by loosening the set screw on the side of the Rabbet bit, and then sliding the Rabbet bit up or down until the tip is flush with the surface of your workpiece.
Once the Rabbet bit is set to the proper depth, you can clamp your workpiece in place and begin milling the joint.
Where The Rabbet Joint Is Used
You should use a rabbet joint whenever you need to join two pieces of wood together at right angles. Rabbet joints are commonly used in the construction of cabinets, picture frames, and box-like structures such as drawers.
Rabbet Joint Advantages And Disadvantages
Rabbet Joint Advantages:
-A rabbet joint is a very strong type of joint that is commonly used in woodworking and cabinetry.
-Rabbet joints are easy to make and don’t require any special tools or equipment.
-They are also relatively easy to repair if they become damaged.
Rabbet Joint Disadvantages:
-Rabbet joints can be difficult to align correctly, especially for beginners.
-If the joint is not aligned properly, it can weaken the overall structure of the piece.
-Rabbet joints can also be more difficult to conceal than other types of joints.
Rabbet Joint Strength
A rabbet joint is very strong because of the way the Rabbet is cut. The rabbet is notched into the wood so that it interlocks with another piece of wood. This gives the joint more strength than a butt joint because there are more surface areas for the glue to adhere to.
Another reason why a rabbet joint is strong is because of the way that it is reinforced. A lot of times, people will put dowels or screws in the joint to make sure that it is extra strong. This is especially important if you are going to be using the joint for something that needs to hold a lot of weight.
Why Should I Use A Rabbet Joint?
You should use a rabbet joint whenever you need to join two pieces of wood together flush at the edge. Rabbet joints are also very versatile and can be used in a variety of different ways, such as:
– To create a corner joint
– To reinforce an existing butt joint
– As part of a dado or groove joint
– To create a Rabbet and Dado Joint
There are many different types of rabbet joints, but the most common is the stopped rabbet joint. This is where the rabbet cut only goes part way into the wood, creating a lip that helps to support and reinforce the joint.
Another type of rabbet joint is the through rabbet joint. This is where the rabbet cut goes all the way through both pieces of wood. This type of joint is often used when joining two pieces of plywood together, as it provides a very strong and sturdy connection.
What Two Tools Are Great For Making A Rabbet Joint?
There are two primary tools that can be used to create a rabbet joint: a Rabbeting Plane and a Rabbeting Bit.
A Rabbeting Plane is a hand tool that is used to cut rabbets, or grooves, into the edge of a piece of wood. This plane has an adjustable fence that allows you to control the depth and width of the rabbet.
A Rabbeting Bit is a power tool attachment that can be used with a router to cut rabbets. This bit has a cutting edge that is perpendicular to the spinning router bit, which allows it to cut a groove into the edge of a piece of wood.
Both of these tools can be used to create a rabbet joint that is strong and durable. However, the Rabbeting Plane is the more traditional tool for this job and will give you more control over the depth and width of the rabbet.
Can You Rabbet Plywood?
Yes, you can rabbet plywood. Rabbeting is simply cutting a groove into the edge of a piece of wood. This can be done with a router, circular saw, or table saw.