Did you know that there is a difference between a stressed joint and an unstressed joint? Most people don’t, but it’s an important distinction to make when you’re trying to treat your wood pain.
In this blog post, we will discuss the differences between stressed and unstressed wood joints, as well as the best ways to treat each type of pain.
What Are Stressed And Unstressed Wood Joints?
Wood joints are one of the many ways that carpenters and woodworkers join two pieces of wood together. The types vary depending on the structural requirements of the project and the aesthetic desired. One of the main considerations when choosing a wood joint is whether it is stressed or unstressed.
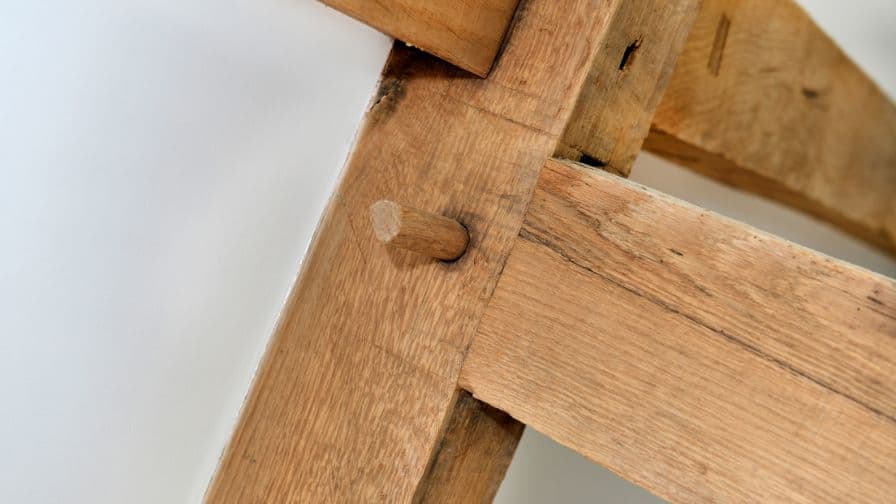
A stressed joint is one in which the wood pieces are held together under tension. The most common type is the mortise and tenon, in which a tenon (a projecting piece of wood) is inserted into a mortise (a corresponding hole). Other types of stressed joints include dowel, tongue and groove, and keyed.
An unstressed joint is one in which no tension exists in holding the wood pieces together. The most common type is the butt joint, in which the ends of the wood pieces are glued together. Other types of unstressed joints include lap, dado, rabbet, and miter.
When choosing a wood joint, consider the strength required, the appearance desired, and the ease of construction. Also, know that some joints are more difficult to construct than others. With a little practice, however, you’ll master any type of wood joint.
How Do You Know When You Have A Stressed Or An Unstressed Wood Joint?
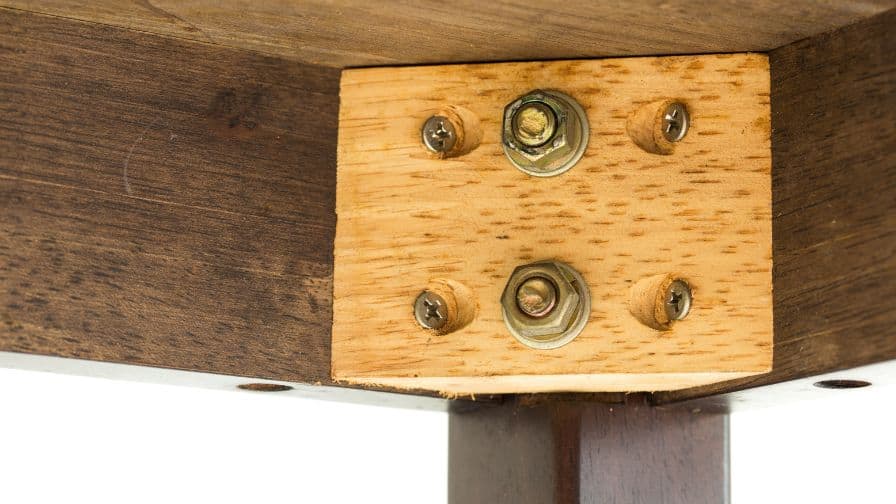
Wood joints are an important element in woodworking, as they provide strength and stability to your projects. There are two main types of wood joints: stressed and unstressed. Stressed joints are held together with screws, nails, or other fasteners that compress the joint, while unstressed joints are glued together.
So how do you know when you have a stressed or an unstressed wood joint? Here are some tips:
-When the joint is held together with screws, nails, or other fasteners, it is a stressed joint.
-As the joint is glued together, it is an unstressed joint.
-Since the joint is hidden away, it is not possible to determine whether or not the joint is stressed without looking at it.
There are some exceptions to this rule, however. For example, miter joints are sometimes both glued and nailed together. In this case, the joint is both stressed and unstressed.
In general, it is best to avoid stressed joints whenever possible. They will fail than unstressed joints and can get difficult to repair when they do break. However, there are some situations where a stressed joint is the best option. Imagine when you need a very strong joint or when you are working with thin pieces of wood that can break if they were not held together securely.
When you are unsure whether or not a particular joint is stressed or unstressed, ask a professional for advice. They will determine the best course of action for your project.
Subscribe to Eric Brennan
It’s important to know that wood glue needs time to set. Unlike other types of glue, wood glue needs clamping for about 30 minutes to an hour to set properly. When you’re in a hurry, you can use quick-drying wood glue. But keep in mind that it won’t become as strong as regular wood glue.
When you’re planning on doing any woodworking, determine how long different types of wood glue take to set. Otherwise, you might find yourself with a weak joint that won’t hold up to wear and tear.
Here’s a quick guide to the setting times of varied types of wood glue:
– Regular wood glue: 30 minutes to 1 hour
– Quick-drying wood glue: 15 minutes to 20 minutes
– Super glue: 2 minutes to 8 minutes
As you can see, there’s a big difference between the setting times of regular and quick-drying wood glue. Since you’re working on a project that requires a strong and durable joint, you’ll want to use regular wood glue and give it plenty of time to set.
Quick-drying wood glue is ideal for projects where you need a fast turnaround time. Keep in mind that the joint won’t turn as strong as it will if you used regular wood glue.
Since you’re looking for an even stronger joint, you can use super glue. It is a great option for projects where you need a very strong bond. But it doesn’t give you much time to work with it.
When you’re using super glue, make sure that you have everything in place before you start gluing. Once you start, you won’t have much time to adjust things.
Super glue is also great for small projects where regular wood glue is too much. For example, since you’re making a picture frame out of popsicle sticks, it is a fabulous option to use.
Now that you know about the setting times of different types of wood glue, you can decide which one is best for your project. Give regular wood glue plenty of time to set so that you end up with a strong and durable joint.
What Is The Weakest Wood Joint?
There are many types of wood joints, each with its weaknesses:
-The weakest wood joint is the butt joint, which is two pieces of wood glued together end-to-end. They are notoriously weak and tend to come apart easily.
-The next weakest is the miter joint, which is two pieces of wood glued together at a 45-degree angle. While not as strong as a butt joint, it is still not very strong.
What Is The Strongest Wood Joint?
The strongest wood joint is the dovetail joint, which interlocks two pieces of wood at a 90-degree angle. These are strong because they have a large amount of surface area in contact with each other.
Another strong wood joint is the mortise and tenon joint, which consists of a rectangular piece of wood (the tenon) that fits into a hole cut into another piece of wood (the mortise). The mortise and tenon joint is strong because the mortise locks the tenon into place.
The third strong wood joint is the dowel joint, which consists of a cylindrical piece of wood that fits into a hole drilled into another piece of wood. It is strong because the friction between the dowel and the wood dowel locks it into place.
The fourth strong wood joint is the lap joint, which consists of two pieces of wood that are joined together at the ends.
There are many types of wood joints, but these four are the strongest. When choosing a wood joint for your project, consider the strength of the joint as well as its aesthetics.
What Are The Best Ways To Prevent Wood Pain In Both Stressed And Unstressed Joints?
One of the best ways to prevent wood pain is to use a quality sealant or paint on all exposed wood surfaces. This will protect the wood from moisture and ultraviolet (UV) rays that can cause it to break down over time.
In addition, regular cleaning and inspection of wood surfaces can identify problem areas before they become serious.
Using proper support systems when building with wood can prevent pain and damage to the material.
Understanding the different types of wood and their characteristics can help you avoid using materials that are more prone to damage and pain.
Always follow the manufacturer’s instructions for installation, care, and use will prevent wood pain.
Recommended Posts:

