Circular saws are one of the most popular power tools in the world. They have been used for everything from construction to woodworking projects. How do you use a circular saw? How can you be sure that it is being used safely? Here at topwoodworkingadvice, we know all about circular saws and how to use them properly! Keep reading below for more information on how to use a circular saw.
Step One: Preparation
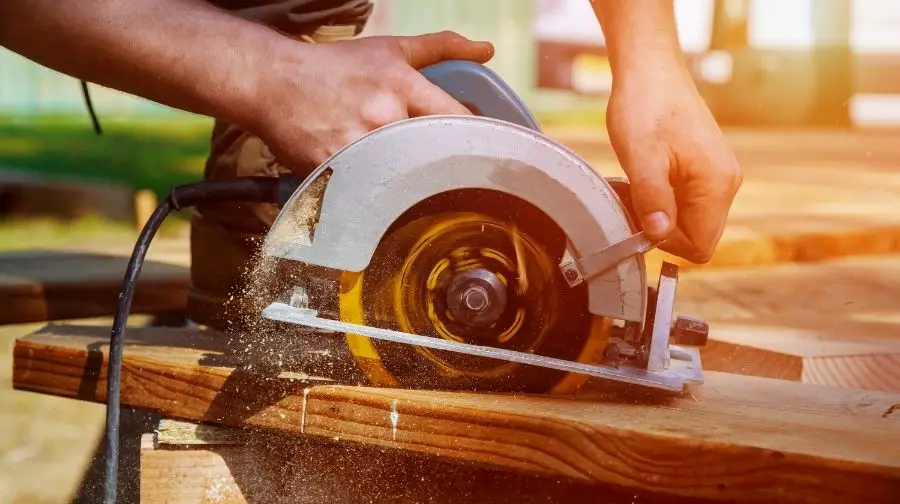
Circular saws are not designed to be one-handed tools. Always secure the workpiece so that it does not move when cutting. Use clamps, a vice, or attach the wood with nails through your work surface for additional safety precautions. A circular saw is most effective when used on boards at least six inches wide and two feet long.
Step Two: Position the Saw
The saw blade on a circular saw should be positioned so that it is perpendicular to the work surface. To find this position, line up the saw’s baseplate with your cutting line and adjust the angle of the blade if necessary. Make sure that you are comfortable when handling the saw. You should be able to see the cutting line easily and have plenty of space in front of and behind the saw.
Step Three: Make the Cut
Once you are in position, activate the saw by squeezing the trigger. Apply pressure to the saw blade with your forward hand while guiding it along the cutting line with your backhand. Do not allow your hands to cross over the blade. Maintain a firm grip on the saw and keep it moving at all times. Do not allow the saw to stall out – this can cause a kickback which could injure you or damage the saw.
Step Four: Finishing the Cut
When you reach the end of your cut, release the trigger, and let the saw blade come to a complete stop before moving the saw off of the workpiece. Do not try to lift the saw off of the wood – this can cause the saw to kickback. Always use caution when handling a circular saw, even after you have finished your cut.
Circular Saws can be used for a variety of projects, so it is important to know how to use them properly.
How to Use a Circular Saw. Everything you need to know
Subscribe to Steve Ramsey – Woodworking for Mere Mortals on Youtube
Are Circular Saws Hard to Use?
No, circular saws are not hard to use. Simply follow these steps, and you will have a smooth, clean-cut in no time!
Which Side Should the Blade Be on A Circular Saw?
To determine which side of the blade should face up on your circular saw, look at the baseplate of your tool. One end is rounded with a larger surface area, and the other has a narrower, pointed end. You should always keep this side of the blade facing up to avoid any accidents.
What Is a Circular Saw Good For?
A circular saw is good for many projects around your home or job site! It can cut through boards with ease and make straight cuts that cannot be achieved with a hand saw.
Why Does My Circular Saw Not Cut Straight?
There are many reasons why your circular saw might not cut straight, from the blade being too dull to an error in assembly or installation of the blade itself! Always check to make sure that you have properly installed any blades and use a sharp one for the best results.
Why Does My Circular Saw Burn the Wood?
Burning wood is typically caused by the blade being too dull. If you notice this, it’s time to replace your old circular saw blade with a new one!
Why Are So Many Circular Saws Left-Handed?
Circular saws are primarily right-handed tools that can be used for both right and left-handed users. Many people who use circular saws are accustomed to this model, so it is often easier to find a replacement blade if needed.
Do Circular Saws Come with Blades?
Yes, most circular saws come with at least one blade, although there may not always be an extra in the box. Replacement blades can be found at your local hardware store for a low price, and you will always need to have an extra on hand in case of emergencies!
Is A Circular Saw the Same as A Skill Saw?
Although some people may use the terms interchangeably, there are actually many differences between circular saws and skill saws. Circular saws have a round blade, whereas skill saw blades are rectangular. Skill saws also tend to be more powerful and can cut through thicker materials than circular saws!
Can I Use a Jigsaw Instead of a Circular Saw?
Although jigsaws may look similar to circular saw blades, they actually work quite differently. They are best used for curved cuts and can be dangerous if used to cut straight lines. If you are looking to make a straight cut, it is always better to use a circular saw!
HOW TO USE A CIRCULAR SAW FOR BEGINNERS
Subscribe to Training Hands Academy on Youtube
How Do You Line Up a Circular Saw Blade?
Before making any cuts with your circular saw, it is important to ensure that the blade is properly aligned. This can be done by using the built-in laser guide on most saws. Simply adjust the angle of the blade until the laser is pointing directly at your mark and you’re ready to cut!
Step-by-Step Process
Follow these simple to help yourself in this process:
Step One: Measure
Once you have the blade aligned, it’s time to make your cut. First of all, measure out where exactly it is that you want to make your mark and draw a line across the surface with a pencil.
Step Two: Set the Depth
Now take your measuring tape or ruler and place one end right up against the edge of the board on one end—Mark where your blade will be cutting through by drawing another line across the surface with a pencil.
Step Three: Cut Out the Hole
When you’re done, it’s time to get out your circular saw and cut away! Extending the depth guide of your circular saw all the way over to that mark that you made on either end of where you want to cut, you can now make your first pass.
Step Four: Get Out the Jigsaw
After completing the circular saw cuts, it is time for a little clean-up work with a jigsaw. Simply use the guide that you made while cutting out all of those holes and follow along while making sure that there’s about an inch of room left around the shape.
Step Five: Sand It Down
The last step is to simply remove all of the rough edges using some sandpaper and give it a good once-over with your sander in order to smooth out any bumps or jagged spots that might be sticking up!
Be sure to measure, set depth, and cut carefully to avoid mistakes when using a circular saw! These simple steps should help you in making clean, accurate cuts every time.
Why Does My Circular Saw Blade Wobble?
If your circular saw blade is wobbling, it’s most likely due to one of three things: the blade is damaged, the arbor is bent, or the table isn’t level.
Let’s take a closer look at each of these possibilities.
The first possibility is that the blade itself is damaged. A bent or cracked blade will cause the saw to vibrate, and will also make it difficult to get a clean cut.
If you suspect that the blade is damaged, the best course of action is to replace it.
The second possibility is that the arbor is bent. The arbor is the shaft that the blade sits on, and if it’s bent, it will cause the blade to wobble.
If you think the arbor might be bent, you can try straightening it with a wrench. If that doesn’t work, you’ll need to replace the arbor.
The third possibility is that the table isn’t level. This is a common problem if you’re using a portable circular saw, because the table is usually made of plastic and can warp easily.
To fix this problem, you’ll need to level the table by adjusting the legs.
Once you’ve determined the cause of the wobbling, you can take the appropriate steps to fix it. By taking care of your circular saw and keeping it in good working condition, you can avoid problems like this in the future.
What Things Should You Do and Be Aware of On Your Body Before Using the Circular Saw?
Before using a circular saw, always remember to wear proper safety gear, including gloves, goggles, earplugs, and a dust mask. You should also make sure to keep your hands on the saw at all times and be aware of where it is pointed as you use it!
Can A Right-Handed Person Use a Left-Handed Circular Saw?
Yes, circular saws can be used by both rights and left-handed people without any problems. In fact, many people find that it is easier to use a circular saw if they are left-handed!
How Many Teeth Should My Circular Saw Blade Have?
Most circular saw blades have about 40 teeth, but it is important to check your user manual for the exact number.
What Is the Closest You Should Put Your Fingers to The Blade While It Is Running?
You should always keep at least two inches between your fingers and the blade while it is running! This will help you avoid any serious injuries in the event that something goes wrong.
Circular Saw Basics
Subscribe to Essential Craftsman on Youtube
How Do You Use a Circular Saw on A Workbench?
When using a circular saw on a workbench, you will need to secure the material that you are cutting with clamps. This will help to keep it stable and prevent any movement while you are making your cuts!
Step-by-Step Process
Follow these simple to help yourself in this process:
Step One: Position the material that you want to cut so that it is flat on the workbench.
Step Two: Place a clamp near each end of the material.
Step Three: Make your cuts by guiding the circular saw along with the clamps.
Make sure to keep your hands and fingers clear of the blade at all times!
How To Use a Circular Saw Without a Table?
If you are using a circular saw without an official workbench, it is important to make sure that the material being cut will be stable. Be sure to use clamps or boxes to hold your materials in place while working!
Step-by-Step Process
Follow these simple to help yourself in this process:
Step One:
Make sure that the safety switch on your circular saw is turned off.
Step Two:
Line up your blade with one end of the wood you want to cut and slowly move it through the piece until you reach the other side. You do not need to go all at once–you can make multiple cuts if needed!
Step Three:
Flip your wood and line up the blade with the opposite end of where you began. Repeat these steps!
How To Use a Circular Saw as A Table Saw?
If you are looking for a more portable option, you can use your circular saw as a table saw. Simply place the material that you are putting on top of the saw and secure it in place with clamps!
Step-by-Step Process
Follow these simple to help yourself in this process:
Step One: Measure and mark the material that you will be cutting.
Step Two: Set the circular saw blade depth to the desired thickness of the cut.
Step Three: Clamp the material in place and make your cut!
If you are looking for a more accurate cut, use a straight edge as a guide.

How To Use a Circular Saw Safely?
Circular saws can be dangerous if not used properly. Be sure to read your user manual before using your saw and always follow the safety guidelines!
Step-by-Step Process
Follow these simple to help yourself in this process:
Step One: Make sure the saw is unplugged and that the blade is covered when not in use.
Step Two: Adjust the blade guard so that it covers the blade.
Step Three: Make sure your work surface is stable and clear of debris before beginning to cut.
Step Four: Place the material you are cutting against the fence, making sure that the blade is directly in line with where you want to cut.
Step Five: Hold your saw at a 90-degree angle from your work surface and carefully begin cutting through the material, keeping even pressure on both sides of the saw as well as moving slowly so that you do not cause any damage to yourself or others around you.
How To Use a Circular Saw to Cut Plywood?
When cutting plywood, it is important to use a straight edge guide. This can be done by either clamping a piece of wood to the material you are cutting or using a saw guide rail.
Step-by-Step Process
Follow these simple to help yourself in this process:
Step One:
Attach the blade to the saw.
Step Two:
Set up your guide rail or clamping board for straight cuts. You can also use a miter box if you are only making crosscuts. If you are using a guide rail, make sure it is snug against both sides of whatever material you will be cutting through. Most circular saws come with a metal guide rail that can be attached.
Step Three:
Line up the blade with your edge guide and make your cut. Be very careful when making these cuts as they are some of the most dangerous in woodworking. Always use a push stick or other means to keep your hands away from the blade.
How To Use a Circular Saw Guide Rail?
A circular saw guide rail is a metal track that can be attached to your workbench. This will help you keep the blade straight as it moves across the material!
Step-by-Step Process
Follow these simple to help yourself in this process:
Step One: Attach the Guide Rail
Attach the guide rail to your workbench. The easiest way is with wood screws, but it may be possible to use clamps if you are working on a temporary project.
Step Two: Attach Your Saw
After attaching the saw to your workbench, line up where you want your cut and lock down the saw.
Step Three: Cut!
Slowly move the saw along the guide rail, being careful to keep it straight. Apply pressure evenly as you cut to avoid blade drift. If your project is large or long, make sure to take breaks and reposition the saw, so you don’t get tired while cutting.
How Do You Cut Small Pieces of Wood with A Circular Saw?
When cutting small pieces of wood, try using a smaller blade. This will help to reduce the amount of sawdust that is created and make it easier to cut smaller pieces!
Step-by-Step Process
Follow these simple to help yourself in this process:
Step One: Cut the Piece of Wood
The first step is to simply cut your piece of wood. You can use a circular saw with either a standard or keyless blade, but if you want small pieces, try using an ultra-thin blade. These blades are perfect for cutting boards down into smaller sections and will also help to reduce the amount of sawdust that is created.
Step Two: Clamp the Piece of Wood
The second step is to clamp your piece of wood in place. This will help to hold it steady while you are cutting and will also keep it from moving around. You can use a C-clamp or a bar clamp for this.
Step Three: Cut the Piece of Wood Again
After clamping your piece of wood, you will need to cut it a second time. This may seem counterintuitive but cutting a board twice is one of the best ways that people have found for ensuring that they get smooth cuts and edges. You can use either a standard or keyless blade for this.
Step Four: Remove the Piece of Wood from Clamp
The final step is to remove your piece of wood from the clamp and check its smoothness. If you still have any rough edges, simply repeat steps two through four until they are gone! By following these simple steps, it should be easy for you to cut small pieces of wood with a circular saw.
How To Make Curved Cuts with A Circular Saw?
Curved cuts can be difficult to make with a circular saw, but there are several ways that you can do it!
Step-by-Step Process
Follow these simple to help yourself in this process:
Step One: Cut the Piece of Wood
The first step is to cut your piece of wood. You will need to use a jigsaw or band saw to do this, and make sure that you cut the wood in two pieces.
Step Two: Mark the Curved Cut on Your Wood
The next step is to mark the curved cut on your wood. You can use a straight edge or a compass for this.
Step Three: Connect the Dots
After marking where you want your curve to be, you will need to draw a smooth curve between your dots. You can use either an eight or ten-inch blade for this, depending on the size of your wood and cut.
Step Four: Cut Your Curve
The final step is to make your curved cuts with your circular saw! To ensure that they are perfect, you may want to line them up with a guideline. You can use a straight edge or a chalk line for this.
By following these simple steps, you should be able to make curved cuts with your circular saw! Just remember that it may take some practice before you get the hang of it.

How To Use Your Circular Saw for Boring Holes
Boring holes is a great way to add detail and character to your wood projects. Here’s how you can do it with a circular saw!
Step-by-Step Process
Follow these simple to help yourself in this process:
Step One: Measure the Depth of Your Bore
The first step is to measure out where your borehole will be going. Generally, they are around two inches deep, but you may want to make them deeper or shorter depending on your project.
Step Two: Mark the Center of Your Bore Hole
The next step is to mark the center of your borehole. You can do this by drawing a line from one side of the wood to another and then measuring in half-inch increments.
Step Three: Drill a Pilot Hole
The next step is to drill a pilot hole. This will help to keep your circular saw from wobbling while you are cutting and make it easier to bore the hole. You can use either a spade bit or a Forstner bit for this.
Step Four: Cut the Hole with Your Circular Saw
The final step is to cut the hole with your circular saw. Make sure that you are cutting on the line that you drew in step two! By following these simple steps, it should be easy for you to bore holes with your circular saw. Just make sure that you take your time and measure everything out correctly.
How To Cut a Straight Line with a Circular Saw
One of the most important skills that you can learn with a circular saw is how to cut a straight line. Here’s how you can do it!
Step-by-Step Process
Follow these simple to help yourself in this process:
Step One: Set the Depth of Your Cut
The first step is to set the depth of your cut. You can do this by adjusting the bevel gauge and measuring how deep you want your blade to go into the wood.
Step Two: Mark Your Line with A Straight Edge
The second step is to use a straight edge or chalk line for marking where you will be cutting. This way, it should be easy for you to stay on track! Make sure that your piece of wood is clamped down securely before you start cutting.
Step Three: Cut the Line with Your Circular Saw
The third step is to cut your line with your circular saw. Make sure that you are keeping the blade parallel to the straight edge and that you are using a slow and steady speed.
By following these simple steps, it should be easy for you to cut a straight line with your circular saw!
Now that you know how to use a circular saw, it’s time to start working on your next woodworking project! Just make sure that you practice first so that you can become comfortable with the saw.
Recommended Posts:

