
When looking for the best stains to paint your furniture, red wood stain comes top of the list. It helps provide a prolonged lifespan even when the temperature continues to change or the wood is exposed to hard UV rays; this stain remains the same. This stain is best for pros and DIYers, making it suitable for home woodworking projects.
However, you can’t always say that as you have bought red wood stains, it will work great. In such conditions where you have purchased from the worst manufacturers, the results would be the opposite. That’s why we compiled the ultimate red wood stain guide while covering all the aspects, including some best red wood stains. So, go through the entire article to solve all your inquiries. Also, consider our mentioned red wood stains as we have spent hours and ended up with them.
What Is Red Wood Stain?
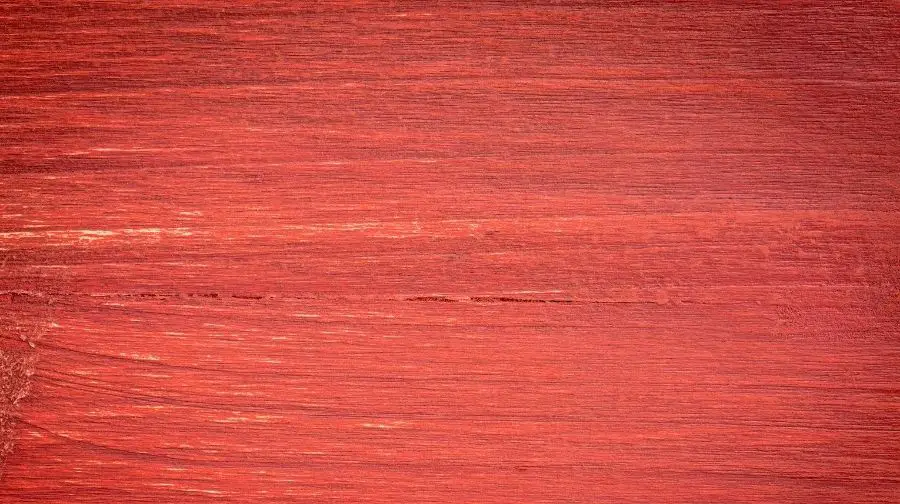
Red wood stain is a strong fruity color that gives a vibrant, attractive tone to the wood. You can use this shade with several other colors, such as its strong contrast color on planters with silvery green and black plants to warm up the garden. However, when it comes to furniture, it makes an ordinary designed wood an even better-looking masterpiece.
Furthermore, depending on the manufacturers, the red wood stain can be extremely eco-friendly while giving the wood a beautiful, semi-transparent, natural finish. Besides staining woods, you can use it for fences, siding, outdoor patio furniture, and playsets. If premium quality resins are used in such stains, they can last longer without fading or darkening over time.
What Is Red Wood Stain Used For?
Red wood stain is not only used to color the wood, but it serves more functions as well. For example, when its layer is added, the red wood stain protects the wood against harmful factors, such as fungus. More precisely, when looking for the objects, you can use red wood stains for tables, shelves, coffee tables, entertainment stands, cabinets, dressers, and more furniture.
Moreover, it prevents rotting, keeps the wood protected even when there are strong UV rays directly coming from the sun. Even if there’s moisture that could destroy the wood, it protects against moisture.
Curious about The Ultimate Blue Wood Stain Guide Please consider reading our article about the topic at this link here https://topwoodworkingadvice.com/the-ultimate-blue-wood-stain-guide/
Can You Stain Wood Red?
Yes, you can stain wood red. Besides giving a glamorous look to the wood, the red stain provides many benefits, such as offering supreme protection and long-lasting paint.
That’s why red wood stain is highly recommended, even for the redwood deck. Remember, while staining wood red, always use premium quality stain and take necessary precautions when going through the process. That’s why we compiled a quick guide on how to stain wood red. Let’s see how it is done in a few steps.
How To Stain Wood Red?
Red wood stain can be used on many finished goods, but we will discuss staining a redwood deck only because that’s the most stained material. Also, it can be quite difficult when compared with others.
If we see the benefits before the application and why it’s necessary, it totally makes sense that red wood stain makes the deck more attractive besides providing long-lasting protection against moisture and rotting. Since the process can be quite challenging, we have divided it into a few steps, making it easy for beginners. Still, if you follow these easy steps correctly, you can end up staining the deck like a pro.
Step #1: Precisely Clean the Wood
Before you proceed to stain the deck, it’s necessary to clean it first. Otherwise, you won’t be able to get effective staining. When cleaning the deck, make sure you use a mixture of dishwashing soap and water. It makes cleaning economical, effective, and safe. Once you’ve cleaned the deck, wait for a few days to let it dry. Depending upon the temperature and humidity, wait for many days until it gets fully dry.
Step #2: Smooth the Wood
Smoothing the wood before staining helps in getting better results. For example, smoothing the surface allows the stain to settle fast. Also, smoothing creates small pores that allow the wood to easily absorb the stain. You need sandpaper for this step. Make sure you get the perfect size sandpaper that can be between 120- and 220-grit for most wood projects.
Step #3: Get Safety Tools
Safety tools are necessary because not only do they keep you protected but also provide an optimal environment, so you feel safe and give your best. For example, getting a knee pad is important not only to protect the knees but also to give a perfect position to reach the deck without getting tired. For increased comfort, get a foam-cushioned knee pad. Get a pair of safety gloves as well to protect your hands and have a firm grip while staining or grabbing tools.
Step #4: Remove Stuck Pebbles
During the cleaning process, you must remove all the dirt and stick liquids. However, you may leave rocks and sticks stuck between the woods. It’s important to remove these pebbles as well for more space for the stain to get absorbed. Otherwise, once you stain the wood and later remove these stuck elements, the whole staining of the red wood will go in vain.
Step #5: Sand the Wood
Now that you’ve worn safety tools, including a knee pad and gloves, get a sander. Start sanding from one side of the wood and make sure you reach every part. Also, sides of the wood as well that most people do not find worth sanding. For better results, we will sand the entire wood, leaving no place un-sand.
You must sand the places between the decks to make the surface even. Also, it gets into a perfect shape that makes the staining process more effective. Remember, never push the sander too hard on the surface. All you have to do is properly hold the sander; let the sander do the rest. Otherwise, pushing too hard can make the surface uneven.
Also, sand the wood from one side and end to the other, so you remember which part has been sanded and which one is left behind. Once you complete sanding the deck, also sand the deck surface, side trim, and railings.
Step #6: Again, Clean the Surface
Now clean a sanded surface using a broom. If you can get a leaf blower, it would do the job quite efficiently. However, a broom also works fine. Make sure you remove all the dust so you can ready the surface to stain. Check the forecast and make sure there’s no rain for at least the next 48 hours.
Step #7: Choose the Best Red Wood Stain
Choosing the best red wood stain is necessary because the ultimate results mainly depend on the quality of stain you’re using. Also, get the one that requires less time and provides efficient results in giving a vibrant and glamorous look. If you’ve used the right stain, you can save time by sealing and staining in a single coat. For your convenience, we have reviewed some of the red wood stains later in this article.
Step #8: Apply Red Wood Stain
When applying the red wood stain, make sure you have at least a 4-inche brush, having either natural fibers or polyester bristles. However, polyester bristles work best in this process but may cost more money. Consider it an investment for the deck and get the one that gives efficient results.
Now when staining the wood, make sure you stain once only and don’t overlap multiple times. The main reason is that first, you’ve got the best stain that requires a single coat, and second, overlapping can make it hard for the wood to absorb the stain. So, for outstanding results, we highly recommend giving a single coat.
Furthermore, make sure you’ve reached all the sides and for that start from one side. Also, don’t stain yourself in the process, or it may ruin the deck. Get the trim pieces or railing in the same way while giving a single coat only.
Step 9: Complete the Staining
When completing the staining, end with staining in the cracks. For that, pour the stain on the tip of your brush and press it between the cracks. The purpose is not only to give these cracks a better look but also to protect against harmful conditions. Use the same procedure to reach the gaps between the woods.
Now that you’ve painted the wood wait for at least 48 hours and let the deck dry naturally. Also, keep yourself away from the stained deck for at least 48 hours and your furniture for at least 72 hours for safety. You can see the deck is drying when it’s getting lighter.
Curious about The Ultimate Black Wood Stain Guide Please consider reading our article about the topic at this link here https://topwoodworkingadvice.com/the-ultimate-black-wood-stain-guide/
How to Apply a Deep Red Mahogany Finish
Subscribe to The Wood Whisperer on Youtube
What Measures Required to Stain Wood Red?
When applying the red stain on wood, make sure you take the following measures to get more effective results while keeping the process safe.
- Precisely clean the wood while removing dust and stuck particles for better results.
- Choose the perfect size for the sander; you can also go for the one we recommended.
- Wear all the safety tools to keep yourself protected and for perfect results.
- Reach between the gaps while sanding and staining.
- Get a polyester bristle brush for more effective staining.
- Start the cleaning, sanding, and staining process from one side and end to the other, or you may leave the part.
- Let the wood dry naturally after staining completely for at least 48 hours.
- Check the weather forecast and make sure there’s no rain in the next 48 hours.
- Keep the rest of the furniture away for at least 72 hours.
Red Dyes On Oak | Red Dye On Maple | Using Liquid Dyes On Wood To Make Red Wood Stain
Subscribe to Keda Wood Dye on Youtube
What are the Best Red Wood Stains?
Now that you know how to stain red wood like a pro, it’s time to get the best red wood stain because the results entirely depend on the process and the stain. After hours of research, we could find the two best red wood stains that are worth considering. Let’s know more about these stains.
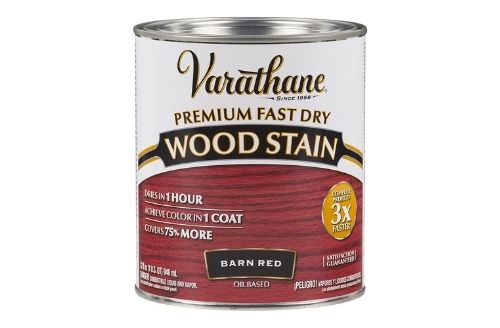
Varathane 307414 Premium Wood Stain is ideal for all interior wood projects, including doors, cabinets, paneling, trims, and most furniture. It can be economical as it consumes less because of single coating requirements. Also, the stain is oil-based, which makes it quick to dry. Once you have painted the wood using this stain, you can touch the stained wood after one hour.
Key Features
- This red wood stain is perfect for indoor furniture.
- It doesn’t require multiple coatings that save stain.
- One box can stain up to 275 square feet, which is a lot it can cover.
- It reveals the wood’s beauty with its stain while giving the wood natural color.
- The stain requires less time and effort in drying.
2. Ready Seal 520 Exterior Stain
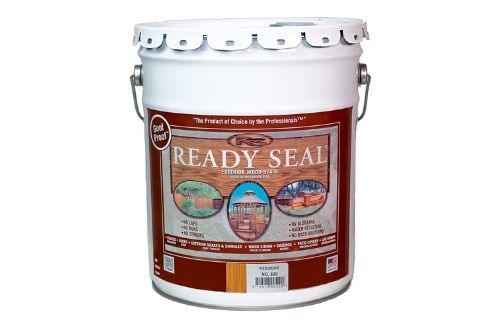
Ready Seal 520 Exterior Stain is one of the best red wood stains that requires no primer. It takes at least 14 days to show its true color, so let it dry naturally and wait for the mentioned period. You can apply the stain using a brush, roller, and sprayer as per your comfort. It doesn’t require diluting, thinning, wet-line application, or similar hurdles before application.
Key Features
- It makes it quite easy for beginners as it requires no diluting or thinning before its application.
- It comes at an affordable price when compared with similar stains in the same category.
- You can apply the stain using any suitable or available tool, such as a brush, roller, or sprayer.
- You can apply it at any temperature as the stain will blend itself.
Curious about The Ultimate White Wood Stain Guide Please consider reading our article about the topic at this link here https://topwoodworkingadvice.com/the-ultimate-white-wood-stain-guide/
Why Get the Best Red Wood Stain?
The best red wood stain offers many benefits besides giving an elegant finish to the wood. Let’s see how it helps you in many possible ways.
- Offers Safety: The red wood stain offers safety against moisture, water, rotting, direct sunlight, and fading. It keeps the wood safe and lets the dangers affect itself, so you can keep the material safe for a prolonged time.
- Quick Drying: Drying the wood after staining can be hectic as it requires more time and effort. In that case, the best red wood stain offers less time to require.
- Long-lasting: While making it budget-friendly, the best red wood stain lasts longer, so you don’t have to stain the wood repeatedly, which makes the process hectic and expensive.

Is Red Wood Stain Waterproof?
Yes, besides protecting the wood from direct sunlight, rotting, it does protect against water. The red wood stain soaks the water itself and never lets it affect the wood. That’s how we can say, red wood stain is waterproof as it provides protection against moisture and rain. Other than water, the stain also protects the wood from spilling liquids, such as oil. Remember, not all stains protect the wood from these elements but only those designed to resist liquids. However, they may come at a higher cost, but as you’ve to protect the wood, they’re worth purchasing.
What to Do If My Stain is Too Red?
Once you have completed the staining process and see the stain is too red — don’t worry; we have multiple solutions for this problem. First, wait for at least 48 hours and let the wood dry naturally because on getting dry, it changes the color, and too red can turn to regular red. Still, if it remains too red, add a brown color coating and let it dry again. It can make the color a bit lighter than before.
How To Color Wood Red With Unique Red Stain Keda Red Dye Tips
Subscribe to Keda Wood Dye on Youtube
Scarlet Red Wood Stain
Scarlet red wood stain is relatively brighter than regular red color and has an orange tinge. Having these colored pieces of furniture will not only warm up the place, but the color also represents courage, joy, passion, heat, and force. Sometimes when you double or triple the coating of red wood stain, you get the scarlet red wood stain.
Barn Red Wood Stain
As we know, red has a wide range of shades, and the barn is one of them. It features a red shade having 49% bright and 98% saturated while giving a great look to the houses. Barn red wood stains can help protect against the rust and fungi that ruin the wood within a few days. When it comes to its use in gardening, barn red wood stain suits all the products from fencing to sheds.
Testing Varathane Barn Red Stain
Subscribe to Dave the Woodworker on Youtube
Crimson Red Wood Stain
Crimson red wood stain is another deep color that’s steeped in tradition and history. It was first used in 1523 in the UK by the Aztecs and Mayans. The stain comes with many benefits, such as it lasts longer while protecting the wood, has low VOC, low odor, allows the wood grain to show through, having rich, long-lasting color, and has a high-build coating. When it comes to its uses, you can use crimson red wood stain for doors, window frames, summer houses, garden furniture, and gates.
Red Wood Stain Exterior
Red wood stain exterior gives a stunning look while helping your house stand out in the street. Most attractive-looking gates are usually painted crimson red. As the exterior wood stain protects against water, rusting, moisture, and direct sunlight, its external use automatically increases. That’s why it’s widely used in external timbers, claddings, garden furniture, summer houses, gates, doors, conservatories, and window frames.
Minwax Sedona Red
Subscribe to England Andy on Youtube