There are many tools that are used in woodworking joinery. Included are various layout tools, hand tools and power tools used in joinery. I have researched all the various tools involved and have put together the definitive guide on joinery tools.
What tools do I need for woodworking joinery? Here is a list of all the layout, hand and power tools used in woodworking joinery. Layout tools include scratch awl, marking knife, marking gauge, compass, calipers, small and large squares, combination square, drafting triangles, protractor and sliding T-bevel. Hand tools include paring chisels, small mallet, jack plane, block plane, hammer, nail punch and dovetail saw. Power tools include jointer, table saw, radial arm saw, dado cutter, router, router table, hand-held drill, drill press and mortising attachment.
Keep reading below to get a more in-depth look at all the joinery tools and what they are used for.
What Tools Do I Need For Woodworking Joinery?
Like any woodworking operation, joinery requires specific tools. Most of these are common woodworking tools. They are not hard to find, expensive to buy, or difficult to use. However, to make precise, well-fitted joints, the tools should be precise and well made.
Woodworking Joinery Layout Tools:
The most important joinery tools are those tools required to measure and lay out joints. If you have only a limited amount of money to invest in woodworking equipment, purchase top-notch layout tools and skimp on everything else. You can cut better joints with a good square and a mediocre table saw than you can with a mediocre square and the world’s greatest saw.
Before you can cut a joint, you must lay it out. Different joints require different layout tools so you must keep a selection of measuring and marking devices in your toolbox. To lay out most joints, you need:
- A Scratch Awl or a Marking Knife to scribe layout lines on the wood.
- A Marking Gauge to scribe lines parallel to one surface of a board.
- A Compass to scribe arcs and circles.
- Small and Large Rules to make most measurements.
- Calipers to make small, precise measurements.
- Small and Large Squares to measure 90-degree angles.
- A Combination Square to measure 45- and 90-degree angles.
- Drafting Triangles to measure 30-, 45-, and 60- degree angles.
- A Protractor to measure “odd” angles (other than 30, 45, 60, or 90 degrees)
- A Sliding T-Bevel to transfer these odd angles to the wood.
You are probably familiar with the rule, compass, square, and other measuring tools. But the marking tools – the scratch awl, marking knife, and marking gauge – may take some getting used to. Most beginning woodworkers use a pencil to lay out cuts. This is a poor choice – pencils are untrustworthy marking tools. As the tip grows dull, the line becomes broader and reduces the accuracy of the cut.
Try This Trick: To make sure a square is indeed square, hold the square’s base against the edge of a board and scribe a straight line along one side of the straightedge. Flip the square over and draw a second line next to the first, using the same edge as a guide. The two lines should be parallel. If they aren’t, your square isn’t.
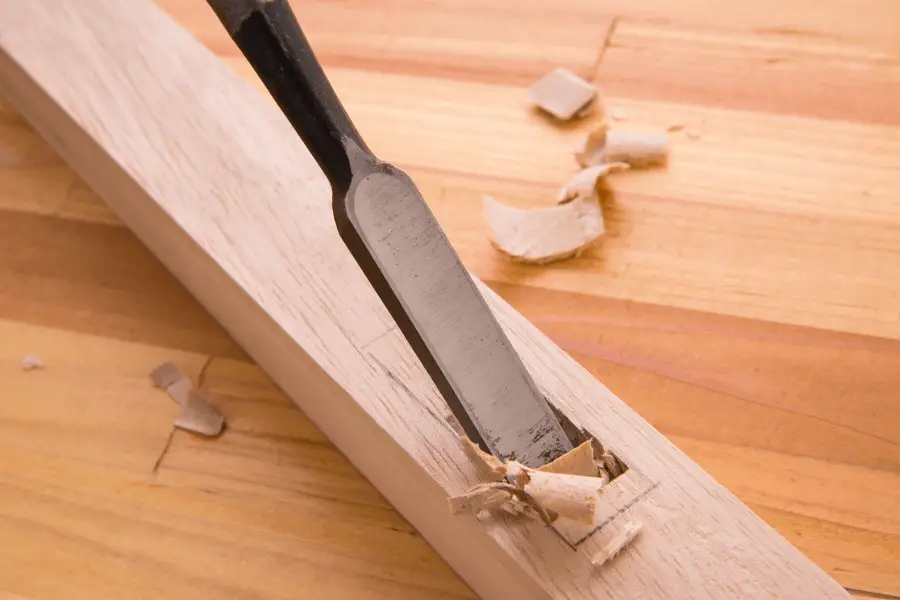
A Scribed layout line – a line drawn with a sharp metal point – remains crisp and even from the beginning to the end. In addition, the point severs the wood grain as you scribe the line. This helps prevent tearing cut not only is more accurate; it’s cleaner.
Scribing a layout line will help prevent the blade or cutter from tearing the wood when you make the cut. The dado on the left was laid out in pencil, and the one on the right with an awl. The sides of the left dado are torn and chipped, while those on the right are clean.
Unfortunately, a marking tool with a metal point is harder to use than a pencil until you acquire the knack. First of all, you must properly sharpen the tool. File the points of scratch awls and marking gauges to look like tiny knives. The points should cut the wood grain, not tear it. When you scribe a line, press down lightly on the tool as you draw it across the wood. If you apply too much pressure, the point will dig in and follow the wood grain rather than cutting a straight line. Make several passes, cutting the line a little deeper with each pass. Continue until the line is as deep as you want it.
Most scratch awls and marking gauges come with round points. These scratch the wood, tearing the grain. File and hone the points to make tiny two-edged blades. A blade cuts the grain, leaving a crisper line.
Try This Trick: If you have trouble seeing a scribed line, dust it with a little of the powdered blue chalk carpenters use in snap lines. When you’re done, simply wipe the chalk off the wood with a damp rag. Don’t use the red chalk; it’s harder to remove and may interfere with some finishes.
Woodworking Joinery Hand Tools:
Even if you prefer to use power tools, you’ll need a few good hand tools for making joints. There are times when it’s quicker to cut a joint by hand than it is to spend the time needed to set up a power tool. Also, there are a few woodworking operations that you can perform better with hand tools, and a few more that you can perform only with hand tools.
We won’t discuss all the useful hand tools just yet; I’ll introduce some of these later, as we need them. Right now, let’s cover the essentials.
At a minimum, you need:
- A set of Paring Chisels – ¼ inch, ½ inch, and ¾ inch – to remove waste stock from mortises, notches, and other joints.
- A Small Mallet to drive the chisels.
- A Jack Plane to smooth surfaces and trim large areas of long grain.
- A Block Plane to trim end grain and small areas of long grain.
- A Small Hammer to drive nails.
- A Small Nail Punch to set nails.
- A Dovetails Saw for making small, fine cuts.
Selecting hand tools is largely a matter of personal preference. You want something that “fits your hand” you’ll do better work and more of it with a comfortable, well-balanced tool than with one that feels awkward.
My Top 10 MUST HAVE Woodworking Hand Tools For Beginners
Subscribe to Crafted Workshop on Youtube
Here Are Some Additional Tips On Selecting Chisels, Planes, and Saws:
What Is The Difference Between Paring Chisels And Framing Chisels?
For fine joinery, use beveled-edge paring chisels, not framing chisels (also called “firmer” chisels). The difference is subtle, but important. Paring chisels have thinner blades with sloped edges, while framing chisels are beefier and have square edges.
These larger chisels are made for carpentry work and cutting large joints. Paring chisels are designed to handle medium-size and small jobs. The thin blades and beveled edges let you cut in tight corners. Make sure you purchase chisels that are designed to be struck by a mallet – not all paring chisels are.
A paring chisel is designed for versatility and maneuverability. The thin blade and beveled edges let you reach into small slots and tiny corners. The framing chisel is not as versatile, but the thick blade and square edges make it better suited for heavy work. Both have their place in your shop, but the paring chisel is more useful for fine joinery work.
When fitting a joint, you often need to remove small amounts of stock from one or more surfaces until the parts mate properly. There is no tool that will do this better than a hand place. Get both a block plane for small jobs and a jack plane for large jobs.
How To Choose A Hand Planer
When selecting a plane, don’t be lured by sexy looks and a high price tag. A plane is a simple tool, and the price makes little difference in how it performs. A medium-quality plane, when properly tuned, will do just as well as the more expensive models.
What Hand Plane Should You Buy?
Subscribe to Jonathan Katz-Moses on Youtube
How To Tune A Hand Planer
There are two important steps to tuning a hand planer. First, sharpen the hand plane iron son the cutting edge is razor sharp, perfectly straight, and reasonably square to the sides. To maintain a straight edge when sharpening the iron, use a honing guide to hold it at a fixed angle to the sharpening stone.
Second, hone the sole of the plane perfectly flat. If it isn’t flat, the plane won’t cut cleanly or evenly. When reassembling the plane, position the cap iron (if the plane has one) so the leading edge is 1/16 inch or less from the cutting edge of the plane iron. If necessary, file the cap iron so there are no gaps between it and the plane iron.
Retract the iron into the plane housing, then advance it very slowly. (If you have a metal plane, turn the depth-of-cut crew. If you have a wooden plane, tap the iron with a mallet.) Stop adjusting when the plane begins to cut paper-thin curls of wood. If necessary, move the iron from side to side until the cutting edge is parallel with the sole.
The sharpness of a plane iron depends on four things. The straightness of the cutting edge, the accuracy with which you hone the bevel or “face” of the iron, how flat you hone the back and how well you polish both the face and the back. To maintain a straight edge and an accurate face, hold the iron in a honing guide. Unless the cutting edge is deeply nicked, start with a medium grit and finish with a fine grit. Remove the iron from the jig and hone the back flat, progressing through the same grits. Finally, polish both the face and the back with buffing compound and a strop, or with an extremely fine stone. Both the face and the back should shine like a mirror.

How To Flatten The Sole Of A Metal Hand Planer.
To flatten the sole of a metal plane, you must make a hone. On a jointer, flatten the face of a block of hardwood that’s about 6 inches longer and wider than the plan. To this block, attach a sheet of 220-grit wet/dry silicon carbide sandpaper using a spray adhesive. (If the block is very big, use several sheet of sandpaper, butting but not overlapping the edges. Hone the plan sole on this block.
When the sole is flat, replace the 220-grit sandpaper with 320-grit. Work your way up through progressively finer grits until the sole is flat and smooth. If you wish, polish the sole with buffing compound on a large sheet of fine leather.
What Is The Difference Between A Japanese Dozuki Dovetail Saw And A European And American Saw?
For most woodworkers a Japanese dozuki dovetail saw cuts faster and smoother than it’s Western counterpart. Unfortunately, it costs more and the blade requires careful maintenance.
When choosing a dovetail saw, consider a Japanese Dozuki Saw. Unlike European and American saws, the Dozuki cuts on the pull stroke, making it easier to control. The pull-cut action also allows the saw maker to use a thinner blade with finer teeth. As a result, the dozuki leaves a narrower kerf and finer cut than Western saws. There is a tradeoff, however. Dozuki saws are more expensive than Western dovetail saw, and the blades are more fragile.
Woodworking Joinery Power Tools:
By and large, contemporary woodworkers rely on power tools for most of their joinery work. Although these require more set-up time than hand tools, power tools will perform most woodworking tasks faster and easier. And for woodworkers who can’t afford the time and practice it requires to master hand tools, power tools do the work more accurately.
There are dozens of power tools and hundreds of accessories for joinery work. But you can make most joints with just a few versatile machines:
- A Jointer to true up boards in preparation for joining them.
- A Table Saw or Radial Arm Saw for butt and miter cuts.
- A Dado Cutter for cutting rabbets and dadoes on the table saw and radial arm saw.
- A Router for cutting rabbets, dadoes, dovetails and mortises.
- A Router Table to hold the router when cutting small stock.
- A Hand-Held Drill to bore screw holes and dowel holes.
- A Drill Press to bore dowel holes and mortises.
- A Mortising Attachment to bore mortises on the drill press.
Some of the machines on the list are redundant and you may not need them all. For example, if you prefer to cut dadoes and rabbets with a router, you don’t need a dado cutter for your power saw. Or if you’d rather cut mortises with a router or drill press, why buy a mortising attachment? As with hand tools, your choice of power tools is a personal preference.
When choosing between power tools, however, you should be aware of their advantages and disadvantages. For example, woodworkers often debate the relative merits of table saws and radial arm saws. If you have a shop with limited space (as most of us do), which one should you choose?
What Is The Difference Between A Table Saw And A Radial Arm Saw?
It is easier to make crosscuts on a radial arm saw. And since you make more crosscuts than any other joinery cut, a radial arm saw could save you time and trouble. However, this machine is more difficult to align than a table saw, and it goes out of alignment easier. Many woodworkers grow tired of check the alignment before every critical cut and trade the ease of the radial arm saw for the dependable accuracy of the table saw.
What Is The Difference Between A Router And Dado Cutter For Cutting Rabbets And Dadoes?
There is also a divided opinion on whether a router or a dado cutter accessory makes better rabbets and dadoes. A router cuts smoother than a dado cutter and the bottom of the cut is perfectly flat. With a dado cutter, the sides and the bottom may be slightly ragged. On the other hand, it requires several passes to rout a deep dado, while a dado cutter will remove a large amount of stock in one pass.

What Is The Difference Between A Stacked Cutter And A Wobble Cutter?
If you opt for a dado cutter, you have two more choices. A stacked cutter or a wobble cutter.
The stacked cutter is made up of several different blades. Two 1/8-inch-thick outside blades or cutters and several inside blades or chippers. Chippers come in widths of 1/16 inch and ¼ inch. To adjust the width of cut, make a sandwich of cutters and chippers, adding or subtracting chippers until the stack is the right width.
The wobble cutter is a single blade between two tapered bushings. The bushings hold the blade at a slight angle on the arbor so the blade wobbles right and left as it spins. To adjust the width of cut, rotate the bushings. This increases or decreases the sideways wobbly. The advantage of a wobble cutter is that it will make a cut of any width within a certain range (usually 1/8 inch to 13/16 inch).
A stacked cutter will only cut in 1/16 inch increments. To make an odd-sized cut, you have to either add shims between the chippers or make several passes. On the other hand, because the tip of a wobble cutter follows an arc, the bottom of the dado cut is slightly curved.
This isn’t noticeable in narrow dadoes, but it may be a problem in wide ones. Also a wobble cutter requires more set-up time, you may have to readjust the position of the bushings several times before the cut is the right width. And a stacked dado cutter is more stable, especially for heavy use. The bushings on a wobble dado can slip.
What Is The Difference Between A Drill Press, Router And Mortising Accessory For Making Mortises?
Finally, there are different arguments for making mortises with a drill press, router, or mortising accessory. Perhaps the quickest way to make a mortise is with a drill press. Simply drill a line of overlapping holes then true up the sides and ends with a chisel.
If you have several mortises to make, it’s easier to use a router. Rout a groove or dado for each mortise, then square the ends with a chisel. This however, requires more set-up time than a drill press.
If you cut lots of mortises, you may want to use a mortising accessory. This drill press attachment enables you to drill square holes. To make a mortise, simply cut a series of overlapping square holes. There’s no need to clean up the ends or sides with a chisel. The trade-off is that a mortising accessory requires careful alignment and maintenance, much more so than either a drill press or router.

Research Source: Joining Wood: Techniques for Better Woodworking (The Workshop Companion)